Wednesday, 10 April 2019

MAJOR PROJECT UNIT: (Research) Colour Correcting and Colour Grading

Colour correcting and colour grading are often used interchangeably when describing altering the colour of a production - however, they refer to different processes.

Colour correcting is performed prior to the colour grade - the purpose of the colour correction is to balance the colours and "making sure footage looks exactly the way that the human eye sees things". [1] This gives a good base image to work off in order to get the best result from the colour grade. The most practical way to perform colour correction is to ensure the "white and black levels match what the human eye sees as white and black, then the other colors should be balanced as a result". [1] Using this method gives you something to focus your attention on so that you are not overwhelmed by the wide spectrum of colours apparent in the footage - instead, you are just focusing on two block colours which in turn will affect the other colours within the footage.

The below image demonstrates how colour correction alters the appearance of footage. The raw footage appears washed out and unsaturated. The colourist has corrected the colour by making the black appear black and white appear white to the human eye, whereas, before the correction, it can be seen that the black appears a faded grey colour. Once this black and white had been restored, the dimension appears to have been brought back to the image instead of it appearing flat. With this added contrast / dimension, the skin tone of the woman has also been brought back to a natural colour and exposure which would be true to that seen by the human eye. Correcting this colour allows a good base for applying the colour grade as if all the footage is corrected using the same base measures (i.e. correcting the blacks and whites to appear black and white to the human eye in every piece of footage) this should result in a similar tone being created across the production as a whole which then means the grade will also appear consistent across the production.


To colour correct in Premiere Pro, there are several different methods which can be used to achieve different looks. Some of these tools are more useful when it comes to performing tasks such as colour grading rather than colour correcting as they allow more in depth colour manipulation than the simple colour correction tools. As I want to focus on the colouring of the project more in the colour grading process, I decided to focus my research on the simple method of colour correction as I only needed to use this process to match up the clips in order to create a consistent look (rather than using these tools to create a specific visual effect).

I used tutorials as research as this displayed exactly how colour correcting can be performed in Adobe Premiere Pro. The tutorial I focused on can be found on this blog;

https://creativepro.com/premiere-pro-tutorial-simple-color-correction-for-video/

To perform simple colour correction on a clip, the effect controls can be altered in the lumetri colour tab by selecting the basic correction option. This allows you to then manipulate the look of the clip in terms of the colour temperature, tint, exposure, contrast, highlights, shadows, whites, blacks and saturation. These settings (in particular, the exposure, contrast, highlights, shadows, whites and blacks) can then be used so that the blacks appear black and the whites appear white to the human eye - once these areas of the footage have been corrected, the colours within the footage should also become balanced. If not, tools such the temperature scale and tint scale can be altered to adjust the tone of the image in terms of the blue, orange, green and purple tones. When using these tools, the focus should still be on the whites and blacks of the image so that they still appear true white and true black when adjusting these settings (instead of taking of the whites and blacks taking on one of these tints which would then give the image an unbalanced look).
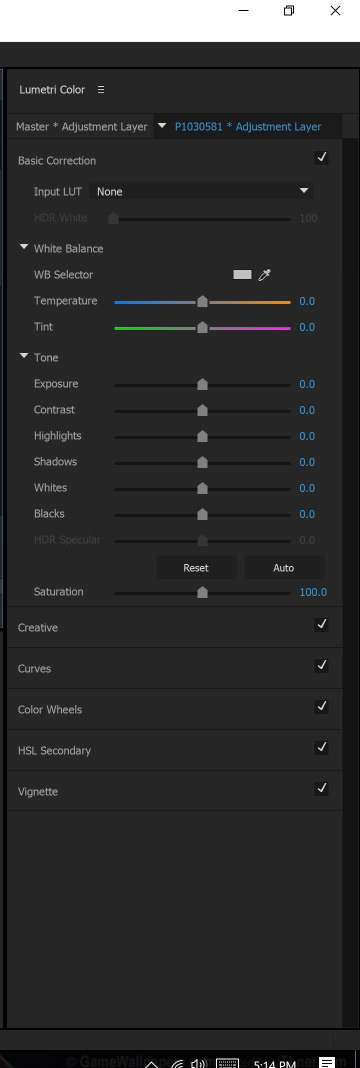

Adjusting these settings should mean you are able to produce a balanced and corrected image that is true to the colours seen by the human eye. However, sometimes a truly balanced image can not be achieved through these settings as there are not many tools to adjust the colour (just the blue, orange, green or purple tints). This means that a better tool to use when adjusting colour (or to even apply a colour look) is to use the RGB curve. This allows you to specifically adjust the red, green and blue tones in all the different areas of the image (highlights, midtones and shadows) rather than just adjusting the image as a whole which is what the temperature and tint settings do. With the RBG curves, you can adjust each red, green and blue curve to adjust the highlights, midtones and shadows by selecting the corresponding point on each line (i.e. to adjust the shadows, you adjust the bottom end of the curve. To adjust the midtones, you adjust the middle point of the curve. To adjust the highlights, you adjust the top end of the curve). For each curve you can move the point up or down to adjust the colour. By doing this on the red curve - dragging the selected point up increases the level of red in this area of the image and dragging it down decreases the level of red in this area of the image by increasing the level of green in this area of the image. By doing this on the green curve - dragging the selected point up increases the level of green within this area of the image and dragging it down decreases the level of green in this area of the image by increasing the level of purple in this area of the image. By doing this on the blue curve - dragging the selected point up increases the level of blue in this area of the image and dragging it down decreases the level of blue in this area of the image by increasing the level of yellow in this area of the image. As already stated, this can be used to correct the image so that the colours are accurate to those seen by the human eye. Additionally, this tool can be used to give the image a specific colour look, similar to that of a colour grade. By adjusting these curves further than necessary to correct the colours in the image, the areas of the photo then begin to take on these colours in a stylistic effect. So if you wanted to manually create the infamous orange and teal look which is prevalent in Hollywood releases, you can do so by increasing the level of blue and green within the shadows of the image by adjusting the lower half of the green and blue curves. The highlights and the midtones of the red curve can then be increased slightly, as well as decreasing the level of blue in the highlights and midtones to give a more yellow look. When these settings are combined, the shadows are given a teal look, whilst the highlights and midtones are given an orange look - manually creating the orange and teal effect. 


Once the colour correction has been performed, instead of manually creating the colour effect using the RBG curves, a LUT can be applied to give the project a colour grade (the RGB curve can then be used to fine tune to colour so that the specific colour look can be achieved).

"LUT stands for Look Up Table. In short, LUT is a table used to map one color space to another." [2]

LUTs are specially formulated to recognise colours within a clip and map their preset over these colours to achieve the set out look. (i.e. the LUT I will be using for my colour grade is an orange and teal LUT. This has an orange and teal colour map which recognises the highlights, midtones and shadows of the targeted clip and applies its preset over this to produce the stated orange and teal look.)

LUTs can be used in a variety of different ways; log normalisation LUTs, film emulation LUTs and creative LUTs. Each type and method of using LUTs serves a different purpose. As I am using a LUT to colour grade (rather than restore the log look of an image), I am using a creative LUT to give my footage a specific colour look. Creative LUTs are used to give specific creative colour looks - or they act as a starting point for these creative looks if further manipulation needs to be performed through the RGB curves. An example of a creative LUT being applied to properly exposed and corrected footage can be seen below [2] :


 The effectiveness of LUTs is affected by the original clip that it is being applied over. A LUT cannot correct an overexposed image or an image where the colours appear unbalanced as they are only programmed to apply their preset over the existing image. Therefore, colour correction needs to be performed first and be layered under the LUT in order for the colour grade to be effective. The colour correction should not be applied after as this will also affect the look of the LUT - the LUT should be applied over already corrected images. An example of a LUT being applied over an overexposed image and a correctly exposed image can be seen below (this shows the difference between the look you get from an incorrectly applied LUT and a correctly applied LUT) [2] :


To apply a LUT in Premiere Pro, firstly, click on the clip / adjustment layer you intend to work with. Secondly, in the Lumetri Panel, open the basic correction tab. Under the basic correction tab, there is an option to select the input LUT. When this option is selected, there is another option to browse - this is where you select the LUT to be applied. [3] 


What have I learnt?

- To achieve the best visual result, colour correction needs to be performed first to give a good base for the colour grade. This corrects the image so that the colours are true to what can be seen by the human eye so that the specific colour look can then be applied and be accurate to the desired look. (i.e. if an orange and teal LUT is applied over footage that has not been colour corrected, the orange and teal won't be applied in the correct manner so won't have the desired effect - the orange and teal won't appear the correct colour as the base colour will not be correct).

- The colour correction and colour grade should be applied on separate adjustment layers over the clips so that they can be removed, applied or manipulated without affecting the original clip.

- I have also learnt how to apply a LUT through the creative control settings. This is something I was previously unaware of as I haven't used LUTs in Premiere Pro before. Learning how to apply a LUT will enable me to achieve the specific desired natural yet cinematic look I set out in my director of photography statement.

- LUTs also have different purposes so the correct LUT needs to be applied to achieve the desired look. Choosing a log normalisation LUT will not give the production a specific colour look as it is not designed to do so, therefore, a creative LUT (like the orange and teal LUT I selected in the pre-production unit) needs to be used to create the specific colour effect.


[1] https://vimeo.com/blog/post/color-grading-vs-color-correction-explained

[2] https://lutify.me/essential-steps-in-color-grading-when-using-luts/

[3] https://www.premiumbeat.com/blog/adding-luts-in-premiere-pro/

Friday, 5 April 2019

MAJOR-PROJECT UNIT: Fine Cut 1

Once Mel had completed the rough cuts of the product, I took over the edit to produce the first fine cut. Throughout editing the rough cut, we had tutorials to guide the edit and provide advice on what needed to be done to improve the product. The main things that needed to be done when I took over the edit were:

- Add an overlay / colour burn to give the impression that the van is moving (scene 3)

- Add a shot of a dog where Tim and Luke have hit it (scene 4)

- Tighten the shots to help the flow of the whole production (e.g. opening sequence a bit long)

- Add sound effects (i.e. printing sounds, owl sounds, owl punch sound, the sound of the dog being hit)

- Add music to the night scene to add to the humour and emphasise the element of sneakiness

- Re-do the owl punch to make this flow better

- Work on the sound and colour of the whole production

The first thing I did was tighten the shots and switch out any shots I felt could convey the narrative better. I worked through the project from start to finish, working scene by scene to remove any pauses between the shots that felt too long and would slow down the narrative. To do this, I mainly used the ripple edit tool and the blade edit tool. The ripple edit tool is used to trim a clip and ripple the rest of the clips following it in the timeline to close gaps created by the editing points. This was handy when trimming clips on the same sequence in order to tighten the shots as this meant no awkward gaps were created between the edit points when tightening the shots. Following my research into Adobe Premiere Pro, I opted for this over the rolling edit tool as this is used to move the edit point either forward or backward which changes the in and out point of a sequence. This means by trimming the end of one clip using the rolling edit tool, the following clip's in point is altered - this is not something I wanted to do during the fine cut as the in and out points of each clip were selected by my co-editor during the rough cut as the points that work best to convey the narrative. My job was to simply tighten these clips and replace any that did not effectively convey the narrative, making the ripple edit tool and blade tool a lot handier for the fine cut of the edit. The blade tool is used to cut a clip wherever you choose - this was handy when I wanted to split a clip (either to remove a section of the clip or to insert another clip such as a reaction shot during a sequence of dialogue). I used these tools on each scene to cut down the project to make it tighter in order to make the delivery of the humour punchier which is especially important in a comedy as humour can be lost if shots are lingered on for too long.

In scene 2, I replaced the shot where Tim gets out of the van to observe the slogan. I did this because the shot used in the rough cut breaks the 180 degree rule slightly as I was capturing Tim's reaction shot to the slogan (which meant the camera needed to be positioned opposite where it was when Tim was sat in the van which was the last shot we saw of Tim). Therefore, it feels a little odd to see Tim from a completely different angle with no shot to transition between these completely different angles. So, instead of this shot, I decided to cut to a wide shot of Tim exiting the side of the van but crop it in so that the slogan can't be seen (which would limit the impact of the following zooming in shot of the slogan). This makes more visual sense to the audience as they can now see that Tim has changed positions from inside the van to outside the van, whereas, before it seemed slightly visually confusing as to why Tim was suddenly facing the camera in a different position to where he was previously sat. I may still put in Tim's reaction shot to the slogan as this adds to humour, but I will place it after the wide shot to retain the better flow of the scene and ensure it still makes visual sense.

One sequence which I completely re-did was the owl punch sequence in scene 11. I re-did this as it didn't seem to flow as well as I envisioned it would, causing some of the comedy of this action to be lost as the punch did not appear as frantic and dramatic as originally planned. In the rough cut, this sequence is made up of 9 clips which delays the action occurring and makes it seem less frantic. In the fine cut, this sequence is made up of 6 clips instead. I still wanted to keep a few different angles as the multiple angles from the multiple clips helps to add to the sense of panic that the character is feeling - however, I knew I wanted to cut down the number of angles from the rough cut as this delayed the action too much. I feel I found a good middle ground where there's still multiple angles in quick succession, but the action keeps flowing. I also swapped the clip and cropped in the shot where Tim punches the owl - it went from being a wide / medium two shot to a clear medium two shot. This closer shot emphasises the punch further, making it appear more dramatic. I swapped the clip as the punch in the original clip didn't look like it had as much impact as the clip I chose - this again works to emphasise the humour as the more impact the punch has, the more shocking the action feels. Cropping the shot in also means the fake owl is in shot for less frames - this is important as it is imperative that the audience cannot tell that the owl has been swapped for a fake owl. Therefore, by making sure the fake owl is in as few frames as possible, the idea that Tim is punching a real owl becomes more believable which works to emphasise the humour. I also adjusted the clips following the owl punch to emphasise Mollie's reaction to the owl being punched out of the air - there are now slightly more feathers falling from the air so that the audience are very clear on what has just happened, and there is also now a zoom in to Mollie's reaction to emphasise the expression on her face.

I also added overlays to scene 3 in order to make it appear that the van was moving. I had originally planned to film a tracking shot travelling under some leaves - so that there would be a moving shot of sky and leaves. I then planned to layer this over the top of the shots of Tim and Luke in the van and change the blending mode and opacity so that this footage made it appear that the leaves were shadowing on Tim and Luke to simulate the movement of the vehicle as they drove by. However, this did not turn out as effective as I had hoped. It looked like some leaves were shadowed on Tim and Luke, but it did not look like the van was moving. I then decided to simulate the movement myself. To do this, I knew the shadows on Tim and Luke needed to change as shadows change when you're driving due to the movement (this was one of the major problems with the technique of overlaying the footage of the leaves as they did not move enough to make it seem like the van was moving). To simulate movement, I added segmented black overlays and added cross dissolves between them. These segmented overlays mimic the look of shadows from trees which natural fall on vehicles when they are driving. I then adjusted the opacity on each one so that the shadows falling on their faces varied - this gave a more realistic look as natural shadows are varied and have different densities so it would look unnatural for the shadows to all be of the same opacity. I changed the blend mode to 'hard light' and then changed to opacity to range between 10% - 20%. I then made sure to cut the overlays when Tim and Luke have hit the dog as they are no longer moving in the vehicle - this helps to show that the shadows are there to show movement as they no longer appear when the vehicle is supposed to be stationary.


I also added in additional footage that had been shot such as the shot of the dog once Tim and Luke had hit it and the shot of the river by the Kent Owl Academy car park. These shots aid the narrative of the production. Showing the dog helps the audience to clearly realise what Luke and Tim have just done. Adding the clip of the river helps to suggest why there is a lot of background noise in scene 7 and 9 due to the car park being positioned next to the river. Although I attempted to rectify the audio in scene 7 and 9, it still proves to be a little distracting without the reason that they are next to the river.

Following these adjustments to the visuals of the production, I took on the task of tackling the audio and making this all match from scene to scene and making sure the audio sounded as crisp and good quality as possible. I worked through the audio from the beginning, focusing on one scene at a time. I selected the audio for each clip and altered it in Adobe Audition as this gives you more creative control over the sound.

I began by capturing the noise print for each clip. I highlighted a segment that was only the background noise and captured this as the noise print of the clip.

I then applied the noise reduction effect and altered the percentage by which the noise would be reduced, the decibel level by which the noise would be reduced, the spectral decay rate and the smoothing. I altered these slightly differently for each clip as I didn’t want to just set certain numbers to work by, I wanted to listen to each clip and match it audibly rather than relying on matching the numbers (as matching the numbers doesn't necessarily produce the same sound depending on the original sound that was captured). Although I performed the noise reduction by ear, I tended to keep the numbers fairly similar as the original audio for each clip was already fairly similar. I chose to keep the percentage of noise reduction quite low (between 20%-40%) as any higher than this caused a slight echoed effect which would reduce the quality of the production. I kept the decibels reduced by between 6 - 10 which ensured that the audio levels stayed similar. I altered the spectral decay rate differently for each clip depending on how much background noise / echoing there was - hovering around 10% seemed to produce the clearest audio (but each clip varied slightly). By treating each clip separately, I feel I was able to achieve the best audio as I was not attempting to use a 'one size fits all' technique. Although, I had to ensure that the background noise within each clip was consistent (if it could not be removed in its entirety) - so, even though I treated each clip as individual audio clips, I had to be sure to recall what the audio levels were like in the other clips within the production so that the element of consistency could be retained. Then for each audio clip, I amplified the audio to bring up the level to around -18db.


Once the main audio of the production had been corrected, I took to adding sound effects to the project. I added:

- the printing sound effect (scene 1)

- engine sound (scene 3)

- hitting the dog sound (scene 3)

- engine sound and purr (scene 6)

- squawking and flapping (scene 11)

- punch and owl reaction (scene 11)

I worked through the project from start to finish to pin point where I needed to add the sound effects.

The first sound effect I added was the sound of the printer in scene 1. This really helps add to the comedy of this scene as before, this was just a painfully awkward silence between Tess and Tim and Tim's following dialogue of "printing" did not make sense. Now that this sound effect has been added, the dialogue makes sense and the silent gap has been bridged. I had to trim the audio so that it fitted perfectly into the gap, without trimming it too far that the printing sound got cut off. I also adjusted the level so that it was consistent with the rest of the audio.

In scene 3 I added more engine noise so that it is clear to the audience that the van is moving. Furthermore, I added the sound of the van screeching to a halt and the sound of a dog being hit and whining. This helps to suggest to the audience what has happened before being shown exactly what has happened by the following shot. This also makes it more convincing that the van has hit a dog - this is something I found through my research into "Filming a car hit scene". In the clips I analysed from The Office and It's Always Sunny In Philadelphia, the sound design is the most important part of making it seem like a character has been hit. To make this sound design as convincing as possible, I added multiple layers such as the engine sound, the sound of the tyres screeching and the sound of the dog whimpering.


In scene 6 I also added engine noise from the moment Tim and Luke enter the vehicle which again highlights to the audience that the vehicle is on and about to move - it would make the production feel unnatural and unbelievable if there was a lack of engine noise which would take away from the natural / observational goal of the product. I also added the noise of the cat purring under the car to highlight to the audience that the missing cat is here and sleeping - this sound effect again works to heighten the humour as it is quite a soft sound following quite a frantic beginning to the scene. This contrast works well to emphasise the humour.

In scene 11 I added squawking and flapping noises as Mollie is handling the owl. This is to highlight that something has been done to the owl in the previous scene by Tim and Luke. These noises help to convey the chaos of the scene - this was missing in the rough cut as it just appeared that the owl was flapping a lot. With the additional sound, the scene feels more frantic and chaotic which works as a good build up to the owl punch.

In scene 11 I also added the sound of Tim punching the owl and the sound of the owl squawking as it has been punched. This helps to make this action even more shocking to the audience as the punch did not feel very severe prior to this sound design. Now that the punch seems more severe, the humour has been restored to the scene. I opted to keep the sound after the punch as minimal as possible as it makes the punch seem more dramatic and stand out. The silence adds to the air of tension and compliments Mollie's reaction to what has just happened to her owl. 

Fine Cut 1:


What went well

- The scenes where I swapped in different clips in (scene 2 and scene 11) worked to make the production flow better. Replacing these clips helped to rid any sense of visual confusion and also helped to keep the pace of the film pretty fast. A moderately fast pace is essential for a comedy as the audience is being set up to laugh and find humour in the action and dialogue which is difficult to do with a slow pace as they would be waiting too long between laughs which may lead to boredom with the film. Furthermore, I found that replacing some of the visuals also helped me to be able to communicate the narrative in the way I had envisioned. This is something I found through my research into acting as both a DOP and an editor - I contacted Tom Baker to ask for his advice and about his experience being both a DOP and an editor. He suggested that by doing both, you care more about the shots used in the product because you were there for both of these production stages and, therefore, know the shots better. This is definitely true of working on VET-MAN - being in control of shooting the shots meant that I knew which ones worked best and delivered the narrative in the best way, whilst my co-editor was not DOP and, therefore, did not shoot any scenes which meant she did not know if there were any particular shots that were better to use than others (i.e. shots where I felt the zooms were slightly better positioned which would make them more effective in delivering the humour). By taking over in the fine cut, I have been able to replace any shots that I feel could be communicated better through other shots as I have a better knowledge of all the shots that were taken throughout the production as I worked as the DOP.

- The sound effects worked to enhance the production. Throughout the rough cuts, it felt like some of the humour from the script hadn't quite delivered, however, this turned out to be due to the lack of sound design / effects present in the rough versions of the project.


What didn't go well

- Correcting the audio of the production appeared to be the most difficult task. I brought up all the levels to be around -18db - this worked well for most scenes and the audio sounds crisp and clear, however, for scene 7 and 9 the background audio is still distracting. Although I performed noise reduction on the clips, the background noise levels rise and fall throughout both of these scenes which distracts from the dialogue. I will attempt to rectify this for the second fine cut - I will attempt to level out the audio so that it all remains at the same level, rather than dipping when there is no dialogue between the characters.

Tuesday, 26 March 2019

MAJOR-PROJECT UNIT: (Research) Editing the Fine Cut in Premiere Pro

As I haven't been the editor for a project for a while, I decided to conduct some research into Adobe Premiere Pro to familiarise myself with the programme once again so that I could work on the edit as efficiently and effectively as possible. I also want to perform some editing techniques that I haven't done before on Adobe Premiere Pro - such as adding a colour grade - so I wanted to ensure I knew how to add things like LUTs to the footage as this is an important part of the colour grading process and affects the visual quality of the final product.

Simple Editing Techniques

Although I join the edit at the fine cut stage, I still thought it would be a good idea to look into inserting clips into the timeline even though this should all be done during the rough cut stage of the project (which would mean I would not need to do any of this). However, I may choose to replace certain clips that the rough cut editor has chosen to insert so it will be handy for me to know how to insert and overwrite clips onto a timeline.

There are several way to add clips to a sequence in Premiere Pro [1]:

- drag the clip from the bin

- drag the clip from the source monitor

- use the insert (,) and overwrite (.) buttons in the source monitor

- drag the clip from the media browser into the programme monitor

The overwrite edit adds the clip by replacing the frames already in the sequence whilst the insert edit adds a clip to the sequence by splitting and forcing clips to shift to accommodate the new clip.

If clips are dragged onto the timeline, the overwrite tool is automatically chosen.

There are then different editing tools to use when the clips are in the sequence [2]:

The selection tool allows you to select specific edit points and perform trims on the clips.

The track select tool allows you to select all the clips in a sequence instead of selecting one clip at a time.

The ripple edit tool allows you to trim a clip and ripple the rest of the clips in the timeline to close the gap between any edit points.

The rolling edit tool allows you to trim a clip by moving an edit point either forward or backwards in the sequence.

The rate stretch tool allows you to either speed up or slow down the clip.

The blade tool allows you to cut a clip wherever you use the tool.


Applying LUTs To Footage

The technique I found on how to apply LUTs in Premiere Pro assumes you already have the LUT you want to apply (otherwise you would need to add the step of finding the appropriate LUT to use for your footage). I already know which LUT I want to use as I used it in the pre-production (using Final Cut Pro to apply it) to test which look I wanted to go for to achieve my desired natural yet cinematic look.

To apply a LUT in Premiere Pro, you need to select either the clip or adjustment layer you wish to work with. Then select the lumetri panel and open the basic correction tab within this panel. In the basic correction tab, there is an input LUT dropdown menu. Once you click on this menu, there is the option to browse for your desired LUT. You then select the LUT of choice and this is applied to the clip / adjustment layer. The LUT can then be altered within the basic correction tab. [3]

Within Adobe Premiere Pro, there is only the option to apply one LUT per clip / adjustment layer. If you wish to apply more LUTs to a clip, more adjustment layers must be created to provide a medium to apply this LUT to.

This is a similar technique to the technique I used to apply the LUT in Final Cut Pro so it should not be too much of a complex task to apply the LUT in Premiere Pro to achieve the look I want.


Sources:


[1] https://helpx.adobe.com/uk/premiere-pro/using/adding-clips-sequences.html

[2] https://www.premiumbeat.com/blog/an-in-depth-look-at-the-adobe-premiere-pro-editing-tools/

[3] https://www.premiumbeat.com/blog/adding-luts-in-premiere-pro/

MAJOR-PROJECT UNIT: Rough Cuts and Feedback

It was Mel's job to sequence the footage and produce the rough cuts of the edit - however, I still thought it necessary that I be present to review the cuts and sit in on the feedback sessions as this would inform how I would take over the edit in the fine cut stage. It was necessary for me to hear the feedback for the rough cuts to ensure that I didn't then unconsciously go against this feedback in my cuts of the edit.

Rough Cut 1:


Rough Cut 2:


Rough Cut 3:


Rough Cut 4 :


The main feedback throughout the rough cuts was that it needed to be cut down in order to give a tighter product. Another constant piece of feedback was that the sound needed to be brought up and clarified, as well as adding more sound design - I will tighten the footage further in the fine cuts as well as editing the sound and adding the sound design).

It was also suggested that it is not clear that Tim has broken in to Tess' house in the first scene - however, this cannot be changed due to not having the coverage of Tim breaking in - instead, we will just focus on making it look like Tim is sneaking around (which gives the impression that he is not supposed to be there). The audience also don't get the sense that Tess is much more successful than Tim as the pictures of here don't clearly display this - however, these were the only images we could get from our actress that made her look successful. Also in scene 1, it works well that the audience don't see the certificate until Tess holds it up, this just needs to be made tighter.

It was suggested that footage or overlays need to be placed over the top of scene 3 when Tim and Luke are driving to indicate to the audience that they are in a moving vehicle - this was always our plan but this will be my job in the fine cut (instead of being Mel's job in the rough cut).

In the following scene, it was also suggested that a clip of a dog in the road be added to make it very clear to the audience what has just happened (on top of the sound design that I will add in the fine cut), this was since added in later rough cuts.

There also needed to be more scenes of the van driving to transition between the scenes (and perhaps a shot of the van pulling quickly into the owl academy to add more urgency to this scene). These transition shots were added in later rough cuts.

It was also suggested that music be added to the night scene to give more of a 'heist' atmosphere - I will do this with the sound design in the fine cut.

Feedback was also given on individual shots that could be made better to improve the overall quality of the production (i.e. a tighter shot on the "I'm VET-MAN" line would be more beneficial to make this more dramatic). Mel implemented these changes prior to handing the project over to me for the fine cut and colour grading stage of the production.

Overall, the feedback on the rough cuts was very helpful as it helped to improve the product. All the feedback was taken on by Mel (or noted for me to adjust in the fine cut - like tightening the product, adjusting the colour and tackling the sound). This gives me a good base for me to build on in the fine cut as the project just needs fine tuning now to allow it to reach its potential.


Thursday, 21 March 2019

MAJOR-PROJECT UNIT: Shoot Day 8

Shoot day 8 - GVs of the van 

Following putting together a rough cut of the project, we noticed there was not a lot to transition between scenes. Therefore, we decided it would be a good idea to get some different shots of the van driving between locations so that these could be inserted between scenes in order to transition the action from one location to another.

I decided to get a range of different shots, ranging from long stationary shots and long panning shots to wide stationary shots and wide panning shots - this would give us a few different styles of shots to work with in the edit. I also had to make sure any corners the van would be turning would ensure that the slogan side of the van would be facing towards the camera - this meant that if the van was driving away from the camera then it would need to turn left to reveal the slogan and if the van was driving towards the camera then it would need to turn right to reveal the slogan.

To make sure the footage was in focus, I decided to use the focus assist tool again which highlights the areas in focus in red so that it is apparent what is in focus and what isn't. This was useful as the van drives past the camera quite quickly so I was able to use the focus assist tool whilst other cars were passing the camera to focus up the shot and then check that the van was in focus whilst driving past by seeing if it showed up in red (which it did).

The locations chosen are filled with natural light from all directions, meaning no additional lighting equipment or reflectors were required to obtain a well exposed image.

The settings I used kept the ISO at 500, an aperture ranging between F/6.3 and F/7.2, a shutter speed ranging between 1/48 and 1/50 and using an ND filter of 1/4. As the weather was quite overcast (cloudy and 12ÂșC), I only needed an ND filter of 1/4 to get a correctly exposed image - no ND filter would have resulted in an overexposed image whilst an ND filter any higher than 1/16 would have resulted in an underexposed image. The shutter speed of 1/48 and 1/50 allows for a natural looking motion blur within the footage whilst allowing a good exposure. The range of apertures also allows for the image to be correctly exposed whilst remaining sharp and in focus (an aperture above F/10 on this camera would result in a slightly soft image). This exposure allows for all the details within the shot to be seen.


As well as filming these long shots of the van driving around, I filmed the shot of the dog where Tim and Luke have hit it with the van. I had not originally planned to capture a shot of the dog where Tim and Luke have hit it the dog as the director decided this was not necessary as it is implied by the sound design and Tim and Luke's reaction in their low angle shot where they are stood over the dog. However, in a rough cut viewing, Simon suggested seeing the dog would produce a better quality product as it clearly displays to the audience what has happened and, therefore, heighten the quality of the piece. This was a little bit difficult to film due to the dog being quite lively - however, as we had the owner of the dog on hand, he was able to control the dog and command it to lie down so that I could capture a medium shot of the dog lying on the ground. The clip does include the owner's hands moving away from the dog but this can be masked out in the editing process. For this clip I used the settings; ISO 500, aperture F/7.2, shutter speed 1/50 and an ND filter 1/4. This helped to keep the shot well exposed with the highlights of the shot not appearing over exposed (e.g. the white in the dog's fur). This is important as it means that all the detail within the shot (even the bright highlights) can be seen which helps to maintain a good visual quality throughout the product.

As well as filming this additional shot of the dog, I filmed an establishing shot of the river by the Kent Owl Academy car park as the audio for these scenes (scene 7 & 9) is quite distracting due to the sound of the river. Initially there were no visuals to suggest the presence of a river by the car park which made the audio seem quite strange as there was no apparent reason for the high level of background noise - this decreased the quality of the product. Therefore, by filming and adding in this footage of the river by the car park to the edit, it shows to the audience the reason for the background noise in the car park scenes. For this shot I used the settings; ISO 500, aperture F/6.8, shutter speed 1/50 and an ND filter 1/4. This ensured a correct exposure where all the detail within the shot can be seen.

What went well

- I was able to capture a lot of coverage of the van driving around to be used in the edit to transition between scenes. This gives us more to work with in the edit and improve the fine cut of the film. This adds a sense of fluidity to the piece as the action is continued through the movement of the van instead of the scenes feeling very stop-start.

- The footage is all well exposed due to using the correct ISO, aperture, shutter speed and ND filter. This means that the footage will be easy to grade and will retain all the details within the highlights, midtones and shadows of the footage.

What didn't go well

- In some of the footage it is apparent that it is not Tim and Luke driving the van as there is no glare on the window. This means these pieces of footage cannot be used as it is obviously Alex driving the van. However, I captured a lot of footage in a variety of sizes so this does not present an issue.

- Ideally we would have liked to insert a Kent Owl Academy sign in the last image shown above, however, due to another sign being in the way this won't be possible. There were no other corners for the van to turn into where there was a sign positioned well (to put the Kent Owl Academy sign over) and where the van would be turning the correct way to show the slogan. However, I filmed a shot of the van driving past the Kent Owl Academy sign in the original shoot week so this can easily be cut in instead to establish the location.

Wednesday, 20 March 2019

MAJOR-PROJECT UNIT: Shoot Day 7

Shoot Day 7 - Reshoot scenes 4 & 6

Due to the time pressures of the original shoot day for these scenes, the footage needed to be reshot in order to improve both the visual quality and to improve the portrayal of the storyline.

The problems we encountered in the original shoot were:

- Our actor playing Sheila was only able to be with us until 12pm, meaning there was a lot of time pressure which caused the footage to look rushed (decreasing the effectiveness with which the storyline was portrayed whilst also decreasing the quality of the visuals as I was rushed in choosing the correct camera settings to use).
- The car park behind Sheila was busy which also added a time pressure to shooting her single closeup as cars behind Sheila began to exit the car park, meaning the continuity of the scene would have been affected if we didn't film this quickly.
- The weather was bright and sunny meaning that there was bright direct sunlight lighting the actors faces, causing quite harsh lighting conditions to work with.

This meant the things I learnt from the original shoot (and noted to rectify in the reshoot) were:

- Communicate with the producer to ensure the cast will be available for the entire call time. This reduced the time pressure of the shoot, enabling me to frame up and expose the footage correctly. This reduction in time pressure also allowed time to wait for activity in the background of shots to calm down in order to ensure continuity throughout the scene.
- Although myself and the producer did check the weather for the initial shoot, we didn't expect the bright sunlight to have such an impact on the footage as it did. Therefore, it was important (when shooting in this location) to ensure the weather would be slightly more overcast. I checked the weather before the shoot which showed the weather to be expected to be cloudy with a temperature of 12ÂșC - giving a much more ideal environment for filming.
- Due to the lack of time restriction, we were able to wait for the carpark behind where Sheila's closeup single was shot to be virtually empty which reduced the likelihood of background activity which would interfere with the shot.

The Shoot

The first scene we shot was scene 4 - this is because the scene involves the character Tim getting sprayed with blood which remains on the character for the remainder of the scene and for scene 6.

In the original shoot we didn't shoot the scene chronologically because of the little time we had with our actor playing Sheila (we needed to shoot the parts of the scene with her first) - however, this made the shoot more complicated and as a result the footage looked rough, rushed and poor quality. To rectify this, we decided to shoot the scene in chronological order to reduce the complications we experienced in the initial shoot as we had no time restrictions on this shoot.

I filmed the same shots as I filmed for the original shoot (but exposed and framed better) plus three extra shots to give us more coverage to work with in the edit. The extra shots included; a closeup single of Tim in the van during the dialogue prior to the surgery section of the scene, a medium closeup single of Luke at the back of the van during the same section of dialogue and a long shot of Sheila searching for Sooty before she walks over to the van. The additional coverage of Tim and Luke allows the dialogue prior to the surgery to be faster paced and adds to the urgency of the situation whilst the additional coverage of Sheila helps to build the narrative on her part more (before this shot was included, it seemed that Sheila appeared from nowhere when she approaches Tim and Luke, however, this shot helps to establish that Sheila had already been searching for Sooty when she stumbles upon the men and the van).

When we arrived and for the first couple of hours of filming, the location was relatively empty meaning that continuity between the shots could be ensured. However, after the first couple of hours of shooting, cars began to arrive for a meeting in the church hall. As we had no time restrictions for this shoot, we were able to break for lunch while the location cleared again - this allowed for the continuity of the scene to be retained.

As well as being a little overexposed, some of the footage from the original shoot was slightly soft in focus. This was due to the fact the bright sun made it very difficult to see the LCD screen and determine whether the footage was in focus or not. To ensure this wouldn't be an issue again, I used the focus assist tool which outlines all elements in focus in red - this meant I could clearly see which parts of the frame were in focus to prevent softly focused images.

As with the other shoot days, I based the settings on those used on the test shoots I performed with the Panasonic and then adapted them accordingly for the location. As ISO 500 appeared to be the best ISO to use throughout the test shoots, I decided to use this ISO for all the footage and just adapt the aperture, shutter speed and ND filter to adjust the exposure of the footage.

The settings I used ranged from an aperture of F/7.4 to F/6.3, a shutter speed of 1/50 to 1/48 and from no ND filter to ND filter 1/16. This all depended on where the actors were positioned within the scene and how this affected the light falling on them. I typically used an ND filter of 1/4 during this scene as a lot of it was either filmed outside or facing outside which meant there was a lot of natural light entering the scene. As it is recommended that you do not use an aperture higher than F/10 with this camera to avoid a slightly blurred appearance, I used ND filters instead to reduce the exposure of the shot. I also did not want to choose a shutter speed that was too fast as I wanted a natural motion blur that would be consistent with the rest of the scenes within the project. On the closeups of Tim putting on the latex gloves and prepping the other equipment for surgery I did not use an ND filter as this was all filmed within the van which blocked a lot of the natural light from entering the shot - therefore, an ND filter would have meant the shot would have been incorrectly exposed resulting in a shot that was too dark. In the sections of the scene where the characters were positioned against the bright sky (as opposed to being positioned against the trees and woodlands), I used an ND filter of 1/16 as the sky appeared overexposed otherwise. Below I have shown the different settings used for the variety of different shots I captured. These settings allowed for the subjects to be correctly exposed where you can differentiate between the shadows, highlights and midtones of the footage - this produces a visually better quality image which also gives the best scope for colour grading. The correct exposure of the images allows for all the detail within the footage to be seen - if it were over or under exposed, detail would be missing from the highlights or shadows of the footage, however, these correctly exposed images retain the detail in all these areas.


Scene 6 was a quicker scene to film as this only required capturing three shots (originally, I had planned to shoot this scene in one continuous shot, however, to make the pace of the piece faster, I captured two additional shots to insert in the edit).

To capture this scene, the director directed it the same way as before - this meant I could shoot the continuous panning shot in the same way as I filmed it in the original shoot. We did make a slight change to this shot as we changed the position of the sleeping cat to be under a car rather than by the gate - this was to make my camera movement smoother as I could just pan in one direction rather than having to pan back to reveal the cat - this made the shot look smoother and more polished, whereas, the original shot looked a little clunky. The distance at which the cat was placed was a similar distance between myself and the van - this meant I could use the same focus when pointing at the van and when pointing at the cat - this also helped to make the camera movement more smooth as I only had to pan and zoom rather than pan, zoom and re-focus.

The settings I used kept the ISO at 500, an aperture ranging between F/6.7 and F/6.4, a shutter speed of 1/50 and ranging between using no ND filter and an ND filter of 1/4. I used an ND filter of 1/4 for the exterior shot to avoid the footage appearing overexposed, I removed this ND filter for the interior shot as this made the footage too dark and underexposed. However, I did change the aperture to F/6.4 as keeping it at F/6.7 still had the issue of appearing too dark - therefore, this wider aperture allowed more light into the lens, increasing the exposure. These settings produced footage that appeared correctly exposed which will allow me to manipulate the footage more accurately in the post production and colour grading process.


I used no additional lighting for either of the scenes. I had planned to use a reflector to supplement the natural light coming from the north east facing direction, however, due to the overcast weather, this made very little difference to the look of the shot as there was not a lot of strong light to bounce back onto the actors. Therefore, I decided against using the reflector as it is a big piece of kit which could potentially interfere with the shots (i.e. be seen in the reflection of the van or dip into frame).

What went well

- Due to the weather being more overcast, the visual quality of the footage greatly improved as this eliminated the harsh lights and shadows that fell on the actors faces in the original footage. This will allow for a better colour grade as there is a lower contrast on the footage - allowing for more manipulation of the shadows, highlights, midtones and the colours within these areas of the image. In order to test how well the footage would colour grade before taking over with the fine cut of the edit, I graded stills from the footage to see how much scope I would have with the grade. I graded a still from the original footage and from the reshot footage to show the improvement reshooting the scene has made to the colour grading process. In order to keep with the natural yet cinematic look I tested in the pre-production unit, I graded the footage using an orange and teal LUT which added teal to the shadows of the footage and orange to the highlights. I reduced the intensity of the LUT to 28.4% in order to retain a natural element to the footage whilst making it look slightly more cinematic. I used the same grade on both the original and the re shot footage to show how much more scope reshooting has given the colour grading process. As shown below, the strong sunlight washes out Sheila (despite the use of an ND filter 1/16) which makes the footage appear overexposed. This meant that a lot of detail within the shot has been lost due to this overexposure, making it difficult to grade the highlights, shadows and midtones separately (all of these elements begin to merge into one). In the re shot footage, Sheila is correctly exposed - allowing the highlights, shadows and midtones of the footage to be manipulated more accurately to get the desired result. The difference between the same colour grade on the original and the reshot footage can be seen below.


- Due to less time pressure, we were able to wait for the car park behind Sheila to be virtually empty before shooting the scene. The original footage had a car reversing behind Sheila during her single medium closeup / closeup shot, making this a distraction to the delivery of her dialogue as the audience may be distracted by this instead of focusing on the dialogue being delivered by the actor. As we were under less time pressure on this re shoot, we were able to break whilst the car park emptied and shoot when there was very little movement occurring behind the actor - making the core focus of the scene Sheila and her dialogue - this allows the humour within this scene to properly be portrayed without the distraction of background movement.

- In the original shoot, the character Tim touches the character Sheila's left shoulder with his bloody hand, however, because of the angle I was filming from, the subsequent bloody hand print was not too apparent in the footage. This was an issue for the director to rectify - he directed Tim to touch Sheila's right shoulder instead in the re shoot so that I could capture this action more effectively. I also decided to re frame this single slightly so that the handprint would be more obvious to the audience in order to ensure the comedy of this action was delivered as effectively as possible - something which was missing from the original shoot.

- Following communication with the director and producer / co editor of the project regarding the rough cut - we decided more coverage would be needed for the beginning of scene 4. Originally, in my shot list and the original shoot, I used a continuous panning shot to capture the action prior to the surgery section of the scene. I felt that this worked well, however, it felt a little dragged out in the edit as the actors had to wait for the camera to pan back to them before they delivered the dialogue. Instead, I decided to still capture this shot in the re shoot but to also capture a medium closeup single of Luke and a closeup of Tim that could be used to make this scene tighter in the edit. Furthermore, in the panning shot in the original shoot, I was unable to do the minor zooms used throughout the rest of the film as this would have altered the frame size to be the same for both Tim and Luke (which worked when zooming slightly in to Luke due to being positioned further away from this actor, however, it made the shot too tight on Tim due to being positioned closer to this actor). Therefore, by filming a single of each of these characters for this section of the scene, I was able to use minor zooms like those I have been using throughout the rest of the filming - contributing to the continuity between the scenes.

- Part of the feedback from Simon in the rough cut viewings was that the scenes involving the van driving away need to be sped up and moved along as they slow the narrative down. To do this, I decided to capture more footage of scene 6 to break up the long continuous panning shot that I originally shot of the scene. The additional footage I shot included a closeup single of Tim in the van and a closeup single of Luke in the van - these can be inserted in the edit after the characters enter the vehicle to make the scene faster paced before cutting back to the van driving away and zooming in to reveal the cat. This was a success of the re shoot as it means we have more coverage to work with in the edit which will enable us to rectify problems that have been flagged in the rough cut reviews.


What didn't go well

- Ideally I would have liked to film another take of Sheila's closeup single due to the first bit being slightly overexposed (however, this is rectifiable unlike the overexposure from the original footage). The reason this could not be re filmed was that another car had arrived in the car park behind Sheila which would have meant multiple other shots would have also had to be re filmed (which would have still carried the same risk of more cars arriving and disrupting the continuity of the scene). Therefore, I decided not to shoot another take of this and instead rectify the exposure in post production. I reduced the highlights of the footage to -22, the midtones to -16, the shadows to -20 and the overall exposure to +9 and added the LUT I used on the earlier stills (an orange and teal LUT at intensity 28.4%) to produce the graded version of the footage as shown below.


- In the wide three shot of Luke, Tim and Sheila, you can see that there is no dog in the van where Tim was performing the surgery. This is due to the positioning of the characters as previously Tim was stood in a way that obscured the open door of the van, however, in the reshot footage, Tim is stood slightly more forward so it is apparent there is no dog in the van. Although, this is rectifiable due to the amount of coverage I captured of this scene. Instead of using this wide three shot, we can use the medium two shot of Tim and Luke and Sheila's closeup single to portray the action within this scene rather than using the wide three shot. This means that you can no longer see that there is no dog in the van.


Wednesday, 13 March 2019

MAJOR-PROJECT UNIT: Voiceover Day

As the audio for the scenes in the Kent Owl Academy car park (scenes 7 & 9) is quite distracting due to the sound of the river behind the car park, Simon suggested that we do a bit of ADR to improve this audio. However, when it came to set up the sound recording equipment for ADR, it appeared that doing ADR actually requires a lot more work than voicing over the original audio. This meant that we couldn't do the ADR with the actors who were already scheduled to come in as we were unaware the sound recording equipment had to be set up differently to how it is usually set up - if we had been made aware that ADR requires a different set up, we would have allowed time to set up the equipment for ADR. However, as the actors were already on their way, there was no time to set up the sound equipment differently.

To make the most of the time with the actors, we decided to record some improvised material instead to accompany some of the van driving scenes. This was so that the ADR day didn't feel wasted - this extra voiceover can then be chopped up and used in different areas of the production to accompany shots where the van is seen driving - this will make it more believable that it is the characters in the van driving around from the locations- it will also help to transition between scenes. (i.e. we recorded a piece of dialogue from Luke where he said "It's just up here on the left" - this can be used in conjunction with a shot of the van turning left towards the Owl Academy to transition the action to this scene).

This improv can also be used in the credits as the final shots show Tim and Luke getting in the van and driving away - this voiceover can then be used to suggest they are reflecting on the events that have unravelled as they drive to their next adventure. This also helps to make the credits more interesting whilst keeping with the tone of the production  - most credits are accompanied by music and whilst we are considering the use of music within the production to heighten certain comedic elements, it won't be the typical upbeat music as heard in the majority of sitcom credits like It's Always Sunny or Not Going Out. This means using voiceover during the credits will retain the audience's attention right until the very end as the action is still unravelling through their dialogue until the last credit has rolled - this maximises the engagement with the product in the hope of making it be received more successfully.


What I learnt:

Whilst the ADR day largely didn't affect me as DOP and fine cut editor (although it does affect the overall quality of the production), it is still useful for me to listen through all the audio so that once Mel has cut up and re-assembled the voiceover into more fluent pieces of dialogue, I can check this and point out where alternate pieces of dialogue from the voiceover may be more beneficial to the comedy of the production. Mel will insert the audio and I will adjust it so that it fits with the rest of the audio of the production as my job as fine cut editor is to resolve any audio issues. The voiceover audio is already extremely clear due to being recorded in the sound booth, but the level will need to be adjusted to be consistent with the rest of the product.