Friday, 30 November 2018

PRE-PRODUCTION UNIT: Test Shoot 3

Blocking and Lighting Tests

The purpose of this third test shoot was to block out a scene in order to work out how the action would pan out based on the script and storyboard. As I created the storyboard before the director blocked out the scene, the blocking is slightly different to the action within the storyboard. I will update my storyboard based on this blocking and on the final version of the script (as the current storyboard is based on the third version of the script). The main purpose of blocking this scene was to help me visualise how it would pan out with the cinematography and for the director to work out the camera and character positions. 

This blocking test shoot also enabled me to see how practical my proposed shot types were and to see how well this fit in with the desired shooting style. Through doing this test shoot, I found that the shooting style worked well to embody the natural, realistic feel as the pans and zooms enabled me to achieve a spontaneous, observational look. As well as this, performing this test shoot enabled me to try out using the camera in the exact shooting style I am aiming for. The purpose of the other test shoots has been to test which camera would be best for the desired visual look or to see how specific scenes pan out, however, this test shoot enabled me to put the entire shooting style together to see how achievable this is. As a result, I have found that this shooting style works very well using the Panasonic DVX200 as the controls are all very accessible, enabling me to achieve the proposed shots.


Despite going for a realistic style, I needed to test lighting as this can still be used to achieve a natural result. Following the information provided by DoP Jamie Cairney, I tested the artificial lighting equipment in ways that mimicked the natural or practical lighting of the setting in order to maintain the realistic, observational style.

Before testing the lighting, I created lighting maps which are available to see in the location mapping blog post. This helped me to see where the natural lighting in each location would come from by mapping out where north, east, south and west were in each location - this would tell me how the light moves throughout the day and, therefore, how each location is affected by this. I will then combine the information about where the natural lighting is coming from with the chosen lighting equipment in the shot list to explain how each scene will be lit.

Firstly, I tested different lighting in a naturally well lit interior environment. For this location, the natural lighting came mainly from the south-east facing double doors at the back of the location and the west-north-west facing windows at the front of the location (behind the subject's head). 

I set the Panasonic DVX200 to some pre-tested settings that I knew would work well to produce a well exposed image - this way I could have an objective view on which lighting equipment worked best. The settings I used were: ISO 500, aperture F/6.4, shutter speed 1/60 and no ND filter. These settings can be seen naturally in the first image labelled 'no equipment'. This produced a well exposed yet flat image. 

Next, I tested using an Interfit reflector to bounce the natural light back onto the subject. This produced the best lit, most natural looking result as the image uses entirely natural light (just using a reflective surface to direct it back into the shot). The reflector was positioned facing opposite the west-north-west facing window which meant that instead of the subject being slightly silhouetted by this window, he ended up being lit by the reflected light.


I then tested using two aputure LED lights, one on a medium setting of 60 and the other on a high setting of 80, however, this made the subject appear unnaturally lit which would defeat the desired natural and realistic look of the production. These LED lights were positioned in front of the south-east facing double doors with the aim of supplementing this light, but it just made the image look unnatural and artificial. 


The results of the interior test shoot:


I then tested the lighting equipment in a night shoot to work out how to light the night scenes within the production. I tested using a reflector, one aputure LED light and two aputure LED lights. I used the Panasonic DVX200 on the settings: ISO 1000, aperture F/5.3, shutter speed 1/50 and no ND filter. The reflector provided no additional light to the scene, allowing these settings to be observed in the first image and ruling out the option of using the reflector in night scenes.

I then tested using just one aputure LED light on a medium brightness setting of 60 and a colour temperature of 5000K. The aim of this was to mimic street lighting, however, using just one light was not enough to expose the subject well enough. The warm colour temperature worked well though, meaning I continued to use this colour temperature when setting up the second aputure LED light.


When lighting the subject with two aputure LED lights, I kept the original light on the same settings and added another light at a setting of 80 and a colour temperature of 5000K. This provided an image with a well illuminated subject which still retained the natural look which could look as if the subject was merely lit by street lighting.


Below are the results of this lighting test. The chosen equipment for night shoots will be two aputure LED lights as this shows the best result:


 I also tested lighting within the pub location as this proved to be a dim lit location, meaning artificial lighting would be necessary to illuminate the subjects. I tested three different options: no additional artificial light (just using the practical lighting within the pub - it should also be noted that there were additional christmas lights which would not be there during the actual production), using 2 aputure lights on a medium (60) and high (80) setting both set to a colour temperature of 5000K and using 2 aputure lights on a high (80) setting both set to 5000K.

The settings I used for this shoot were: ISO 800, aperture F/5.3, shutter speed 1/60 and no ND filter.

As shown below, using just the pub's practical lighting produced a dull image in which the subject is barely visible. Although this is the most natural way of lighting the set, this produced the most unnatural result - proving that artificial lighting is sometimes better and necessary.

Using both aputure lights, one on a medium setting of 60 and the other on a high setting of 80 both set to 5000K produced the best result. Whilst the subject isn't as well illuminated as the third test, this produced the most natural looking result as if the subject was just being lit by lighting within the pub - therefore, this lighting will be used for the pub scene.

Using both aputure lights on the high setting at the same colour temperature produced an unnaturally lit look which looks artificial and, therefore, takes away from the desired realistic look of the production.

Something to note about this location is the reflective surfaces such as the TV screen in the background, I must ensure that none of the crew, camera equipment or lighting equipment can be seen in this during the shoot.


The final lighting test I performed was an exterior shoot with a reflector and an aputure LED light. From the other test shoots, I had thought of just using natural light for exterior daylight scenes as this proved to produce a well exposed shot on the camera, however, I still wanted to test using lighting equipment to see if this would produce a more enhanced (yet natural) look.

I started by testing the reflector and reflecting the natural light from the north and west back onto the subject. This produced the best result as it illuminated the subject slightly better than just the natural daylight and helped to retain the natural look which is key to the production of VET-MAN.

I then tested using one aputure LED light on a medium setting of 60 and a natural colour temperature of 4200K. This made the subject look too artificially lit and unnatural which goes against the desired realistic look.


From this test shoot, I have decided on the lighting I will use in each of the scenes of the production - I will write this information in the shot list so I know how each scene is lit when it comes to the production.

The daylight scenes (both interior and exterior) will be lit naturally and supplemented with an interfit reflector.

The pub scene will be lit with the aputure LED lights.

The night scenes will be lit with the aputure LED lights.

Friday, 23 November 2018

PRE-PRODUCTION UNIT: The Storyboard

The storyboard is based on the third draft of the script as this was developed enough to give a clear idea of the story and the scenes will remain in the same order with similar action taking place (with certain bits getting cut and added).

To create the storyboard, following my research, I read through the script and picked out which action was required to depict each scene. I took into consideration that during dialogue scenes, it is not only the person talking we need to see - we also need to see the reaction of other people involved within the dialogue.

When drawing each scene I had to consider how many people were in each scene to ensure each character is depicted - in some scenes the action of a certain character takes priority, however, it is important to remember that the other characters are still there and need to react to what the character is doing. I also needed to consider how the situation at the beginning of the scene was different to the situation at the end and how this would be depicted within the shots - I needed to consider whether everything needed to be overtly depicted or whether certain things can be done through dialogue (e.g. when Tim smashes the vase in the first scene, I was unsure whether to have a shot of the smashed vase or just the reactions of Tim and Tess, however, I thought it would be more shocking to have a closeup shot of the smashed vase).

It is also important to consider who the audience are most interested in within the scene and within the production as a whole. As VET-MAN focuses mainly on Tim, he needs to be either the centre of attention for each scene or the impact of his actions need to be the focus. I also needed to consider the subtext of the scenes and consider that not only the dialogue needs to be covered but also the non-verbal cues - this was mainly the reactions of characters which I have emphasised through crash zooms.

As the production contains a lot of panning, tracking and zooming, I found this quite difficult to storyboard, therefore, I added these actions as annotations and just drew the final position of the shot.

The storyboard will be developed based on the final draft of the script once this is complete - however, this storyboard based on the third draft gives a clear idea of the plot and action and how this will be captured through the cinematography of VET-MAN.

Tuesday, 20 November 2018

PRE-PRODUCTION UNIT: Location Mapping

Before conducting my third test shoot, I decided to map out the locations to decipher where the natural light would be entering the setting. This is to help me determine whether it will be necessary to artificially light the environments we will be using (but still achieve a natural look) or whether the natural light itself will be enough to sufficiently light the actors and location (whilst still retaining a good quality, natural look).

The maps of the locations help to show where the sun rises and sets in relation to the location and, therefore, which area of the location will receive the most natural light. Naturally well-lit spaces are south facing due to the way the sun rises in the east and sets in the west, this allows for a lot of natural light and reduces the need for artificial lighting. North facing spaces are naturally less well-lit (or receive light for a smaller period of the day), making it more probable that artificial lighting will be needed to supplement the natural light. North facing interior locations are more likely to be easier to control the lighting as, with less natural light, the natural lighting changes less - meaning the lighting within the environment could be made up of entirely artificial lights and therefore be easier to manage.

It is also important for me to understand the amount of daylight available in the day so that I can work with the producer and director to schedule which scenes need to be filmed when as the lighting conditions will affect the look of the production.

The proposed filming dates are 6th February 2019, 7th February 2019 and 18th February 2019- 22nd February 2019. The daylight times for these dates are:

6th February 2019 - Sunrise: 07:27 - Sunset: 16:56 - Daylight Time: 09:29 hours

7th February 2019 - Sunrise: 07:26 - Sunset: 16:58 - Daylight Time: 09:32 hours

18th February 2019 - Sunrise: 07:06 - Sunset: 17:18 - Daylight Time: 10:12 hours

19th February 2019 Sunrise: 07:04 - Sunset: 17:20 - Daylight Time: 10:16 hours

20th February 2019 Sunrise: 07:02 - Sunset: 17:21 - Daylight Time: 10:19 hours

21st February 2019 - Sunrise: 07:00 - Sunset: 17:23 - Daylight Time: 10:23 hours

22nd February 2019 - Sunrise: 06:58 - Sunset: 17:25 - Daylight Time: 10:27 hours 

These times were found on timeanddate.com - looking specifically at the Maidstone area.

https://www.timeanddate.com/sun/uk/maidstone?month=2&year=2019

Tess' House

Tess' house is west-north-west facing meaning that the front of the house receives the least natural light. The majority of the action in this location takes place in the living room which is naturally lit well from the south-east facing double doors at the back of the room. As the action takes place towards the west of the room, it may be necessary to add some artificial light as there is another light source at this end of the room (which may cause the character to become silhouetted as it will be behind where the characters are positioned).

I will need to test this with different light sources and reflectors as it may prove difficult for me to introduce artificial means of lighting to the production due to the handheld nature of the camera and the constant movements and zooms (the lighting will need to be easily transportable around the set).

Due to the position of the location, the best time to film will be from morning to mid afternoon. This means the majority of the light will be coming in from the double doors facing south-east, lighting the characters well. Filming here should finish before the light comes directly through the west facing window as this will create harsh silhouettes.


Van Pick-up

The alley / road / driveway where Tim meets Luke to pick up the van is south facing. Tim will approach the driveway from the west, and therefore, this scene will likely be shot facing towards the north / west direction. So, like Tess' house, I did consider using some artificial light to supplement the natural light to ensure the characters are well-lit - but due to this being an exterior location, the natural light should be sufficient (as natural exterior lighting has proved to work well to give the desired look with the Panasonic DVX200 through the test shoots).

In the upcoming test shoot, I will test using a reflector in an outdoor environment to see if this improves the visual quality of the image whilst still retaining a natural look. 

The filming here can take place during any point of the daylight times as the lighting is not obscured, meaning no harsh shadows should be cast on the van or the characters. The best time to film would be around midday to reduce the risk of any shadows interfering (but as just stated, shadows shouldn't be a major issue due to the exposed nature of the environment).

Sheila's House

Sheila's house is also north-west facing meaning the front of the house (the area which will be used for filming) will receive the least natural light. As we will mainly be using the exterior of the house, the lighting should be sufficient to film the scene and it is likely that artificial lights will not aid the look of the shot whilst also preventing the fast paced camera movements and zooms.

Therefore, again I will experiment using reflectors in an exterior location to bounce the light onto the subject. I will position the test subject facing different directions to see how bouncing the light back works with the light source coming from different directions.

The best time to film this scene would be morning to mid afternoon (before the sun begins to set) as this will prevent too harsh light shining onto the doorway during this.

The road outside Sheila's house is also used for the scene. Again, artificial lights would potentially interfere with the camera movements and shots, however, a runner with a reflector would be able to bounce light back into the scene effectively without interfering with the shot.


Owl Sanctuary

At the owl sanctuary we will be filming along the pathway and in the woods behind the buildings and owl enclosures. The pathway is quite naturally well-lit due to light being able to access the location from all directions, however, as the majority of the light will come from the north-west direction, there will be less time in which the pathway is in direct sunlight - this may actually be beneficial for the shoot as too direct sunlight could overexpose the image and create harsh shadows.

This scene has been adapted to occur in the evening, therefore, this will need to be artificially lit - I will be testing the aperture kit for night shoots in the test shoot.

As this location will also be used in daylight, as previously stated, I will test using a reflector in an exterior location to reflect light back at the subjects to see if this provides a better lit image whilst still retaining the natural look.

I will also test the difference between using a reflector and an LED light in a shaded area as we are using a wooded area behind the owl enclosures and buildings to shoot in. In previous test shoots, this location has proved to be well-lit enough to produce a good quality, true to life image - however, I will test whether using a reflector would enhance this further.

Due to the wooded area being completely covered in shade, I do not need to map out where the shade will fall as this will be the entire area.


The Pub

As this scene takes place in the evening, I will need to artificially light this location (both the interior of the pub and the carpark). The sun will either be setting or will have set when it comes to film this scene - therefore, if there is any natural light it will be coming from the west. This light will be a little obscured before it reaches the car park by houses and trees - this means there will be little natural light. In the car park there will be practical light in the form of street lighting and my aim is to supplement this the LED lights and a reflector. I will test this in an exterior location at night with street lights to see how the best quality (yet still natural) image will be attained.

The interior of the pub is quite poorly-lit as it is a small, old style pub. As this scene will take place during the evening, there will be little natural light coming through the windows - therefore, without artificial lighting, I would just be relying on the practical lights within the pub. I will be testing using LED lights in the pub.


Mapping out the locations has enabled me to figure out how the sun affects the settings and how I will need to compensate for this by considering; when the scene will be filmed to work best with the sun position, whether artificial lighting is needed to supplement / replace natural light, whether a reflector would be best for natural light in that scene and whether its possible to solely rely on natural light for certain locations.

This will all be tested in the next test shoot.

Tuesday, 13 November 2018

PRE-PRODUCTION UNIT: Presentation Two

To update Simon and the group with the progress made on VET-MAN, we produced a powerpoint presentation to display everything that had been achieved so far.


The feedback we received on this was very positive. The only thing that seemed to be lacking from my progress was lighting tests as I had decided to go for an entirely natural feel - however, Simon highlighted how a natural look doesn't always mean natural lighting - artificial lighting can be used to create an enhanced natural look which will improve the visual quality of the product. From this I decided to plan some lighting tests to see whether artificial lighting would, in fact, be better than natural lighting.

Thursday, 8 November 2018

PRE-PRODUCTION UNIT: Test Shoot 2

Today we performed the second test shoot for VET-MAN. Having tested all the potential camera choices in the first test shoot in October, I knew which camera I would be using for this test shoot (and for the final film) - the Panasonic DVX200. Therefore, in this test shoot I solely focused on testing the different settings again (using the extra knowledge from my research into the camera) and seeing how the camera would work in a complex scene from the script. This allowed me to see how the camera performs when filming this scene and also allowed me to work with the director on blocking the scene to decide which camera angles would be best to capture it - this also gave me the opportunity to see how well I worked with the director and if there was any feedback I could give to make the collaboration run smoother during actual filming.

As the original plan with this scene was to mask the footage in the edit so that the real and fake owl could be interchanged when it came to the 'owl punch', I set the camera up on the tripod as this would make it easier to map the footage. But as the idea with this project is to go entirely handheld, I planned to add a manual handheld shake to the footage in post production - this would give the illusion that the footage was shot handheld and would keep up the continuity of the piece. I also shot some footage handheld to allow enough coverage to experiment with in the edit. As it turned out, we will not map the footage in the edit, we plan to use clever cuts as this proved effective in the edit after this test shoot, meaning that I will be able to shoot this scene entirely handheld after all - I will discuss this later.

To start out the test shoot, I white balanced and black balanced the camera to ensure that the camera was well adjusted to the shaded filming environment - this meant that the white and black seen by the camera would be the same as the human eye. As found through my research, unless the camera is set to auto white balance (which is far from ideal), it cannot automatically decide how white and black look in the different light. Therefore, it was important for me to set this first to ensure the colours were accurate for the environment and the natural light in this setting.


Even though the purpose of the first test shoot was to experiment with the settings on the camera to discover how to get the best exposure, I still wanted to test a few different settings to ensure I got the best image possible. Also, as I was testing multiple cameras on the first test shoot, I was conscious that I may not have spent enough time discovering the settings of the Panasonic. I have also conducted more research into the Panasonic so I wanted to put this knowledge to the test as well.

As I couldn't find the settings for ISO last time, this was something I looked into during my research. Through my research, I found that to change the ISO manually, you must go through the settings and change the ISO for the different 'gain' settings. As I was shooting on low gain, I made the ISO for this 500 as this proved good in the last test shoot - the exposure was good with little noise in the footage.

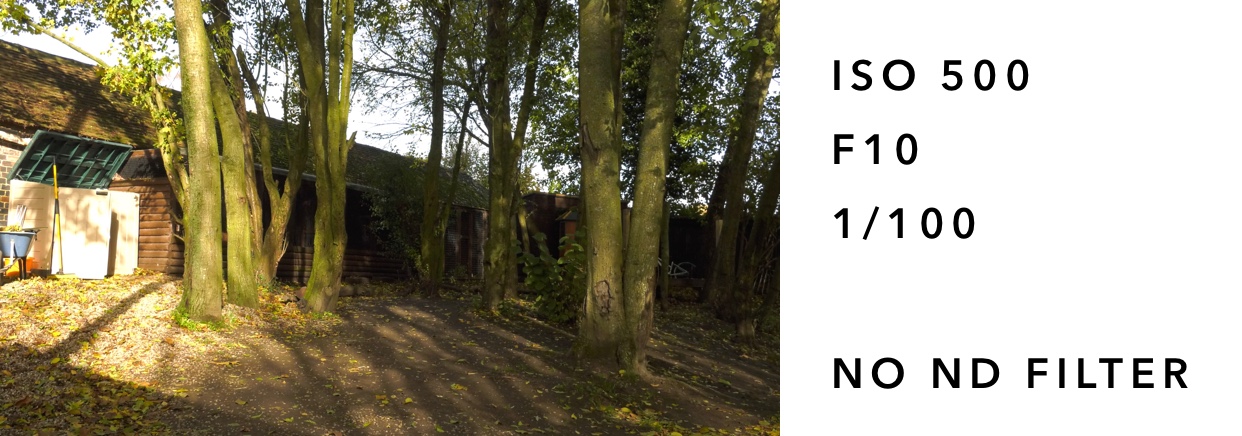
Also during my research, I found that using an aperture deeper than F8.0 (e.g the aperture I used F10.0) will make the image appear softer through diffraction - I wanted to test this in the test shoot to see whether I could notice this difference so that I know what look to avoid during the actual shoot.

The image did appear slightly softer but not to a noticeable extent. However, I will avoid setting the aperture deeper than F8.0 to reduce the risk of a soft image as I am able to get a good exposure by changing the other settings on the camera which do not affect the softness of the image. I set the shutter speed to 1/100 which is faster than the shutter speeds used during the last test shoot. As it was a brighter day, using a faster shutter speed didn't actually make the footage too dark (which is what I was expecting following the last test shoot where I stuck between 1/50 and 1/60). In fact, without an ND filter, the footage was too bright - the sky and the beige door appeared over exposed.


Due to the first image being overexposed, I decided to see how similar settings would look with an ND filter applied as well. I decided to widen the aperture to F6.4 to ensure the image didn't look too soft - this would also allow more light into the lens as, without widening the aperture but applying an ND filter, the image may look too artificially dull. I decided to keep the shutter speed set at 1/100 as this appeared to be good for capturing motion and applied the ND filter 1/4. This gave the ideal look - the sky remained bright but with a tint of blue, the door remained its natural beige colour, and the rest of the image is not underexposed. 


After seeing how an ND filter affected the exposure of the image, I decided to see whether this look could be replicated just by adjusting the camera settings. The wider aperture of F7.2 and faster shutter speed of 1/100 and no ND filter resulted in a darker image where the beige door appeared how it did in real life, however, the sky between the trees still appeared overexposed - it appeared white instead of the blue seen in reality. This shows that using an ND filter can be necessary when aiming for as realistic image as possible - it can be difficult to ensure the sky is not overexposed without affecting the quality of the image (because to reduce the exposure I would need to go for a deeper aperture or faster shutter speed but adjusting either too much may decrease the quality or how realistic the image looks - a deeper aperture may cause a softer image by diffraction and using a shutter speed that is too fast may eliminate any motion blur which would give the footage an unrealistic smooth quality).


Although the second set of settings produced the ideal result, I still wanted to see if using a darker ND filter would improve the look of the image. As well as applying the ND filter 1/16, I set the aperture at F6.8 and chose a slower shutter speed of 1/48. Decreasing the shutter speed allows more time for light to enter the lens, meaning a brighter exposure. I thought it was necessary to decrease the shutter speed as the ND filter is quite heavy and produces a very dimly exposed image so allowing more light into the lens will allow a brighter exposure. For the same reason I also widened the aperture to increase the amount of light coming into the lens. This gave a realistic look with the sky appearing bluer than the other images but some of the shadowed areas appeared too dark and underexposed. 


Overall, the settings for the second piece of footage gave the ideal result - using ISO 500, aperture f6.4, shutter speed 1/100 and an ND filter 1/4. This gave a really realistic result where the sky doesn't appear overexposed and the shadows are not underexposed. These settings also allow for the natural shadows from the sun to show up - with the first settings, these shadows appeared too harsh, whereas in the other pieces of footage, the shadows appeared too soft - giving a less natural look. 


As well as testing the settings on wide angle shots, I decided to test the settings with the lens zoomed in on a close up shot to see what settings gave the best exposure and the best depth of field for the most natural cinematic look.

The first set of settings I tried were ISO 500, aperture 6.4, shutter speed 1/100 and no ND filter. This gave a well exposed image, however, it was a little bright in areas (e.g. at the top of the tree and the metal of the cage behind the tree). As the aperture was quite wide, there was a fair depth of field, however, for a close up shot I would ideally have liked the depth of field to be greater to make the subject stand out more within the frame. As with a lot of the footage of the wide angle shot, I used a faster shutter speed than I used in the last test shoots as I found this gave a good result with the exposure. From this, I have decided that I would like to shoot with a shutter speed between 1/50 and 1/100 - I will test this in the next test shoot.


For the next set of settings, I tested ISO 500, aperture F5.3, shutter speed 1/50 and ND filter 1/4. This produced an ideally exposed image where the depth of field is deep but not indistinguishable. The wider aperture of F5.3 produced this deeper depth of field, and this combined with the slower shutter speed allowed for a bright enough exposure with the 1/4 ND filter applied. The application of the ND filter meant that none of image became overexposed whilst allowing for a greater depth of field created by the wider aperture. 


I also decided to test using the ND filter 1/4 with the settings ISO 500, aperture F6.2 and the shutter speed 1/180. Using a faster shutter speed resulted in a darker image - I also deepened the aperture to F6.2 which also darkened the exposure - however, I wanted to do this to combat how dark the faster shutter speed had made the background. I thought that deepening the aperture would make the background more distinguishable but as the exposure is too dark, the background is too underexposed to show detail.


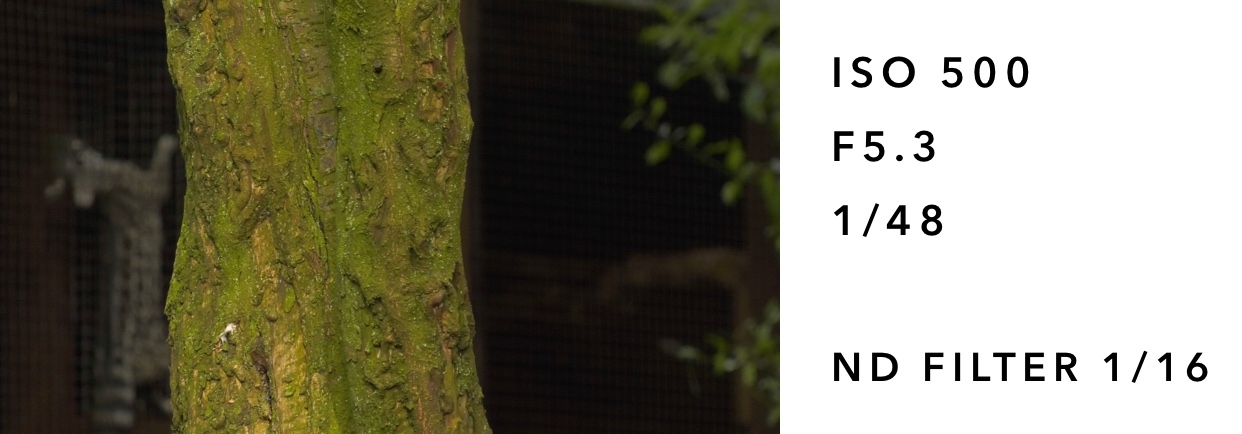
Finally I tested the settings ISO 500, aperture F5.3, shutter speed 1/48 and ND filter 1/16. I wanted to see how using the ND filter 1/16 would work on a closer up shot, however, it meant that the background was too underexposed so all detail here is lost. The better naturally lit side of the background (the left hand side of frame) shows more detail than he right side of the frame which is plunged into darkness with a great lack of detail. To combat the darkness I chose a very wide aperture and a slow shutter speed to allow more light into the lens, however, this could not combat the darkness enough and ended up producing an underexposed image. I feel like these settings would have worked better under brighter or harsher light but as this was a shaded environment, the heavier ND filter was unnecessary. 


Overall, I found that the second set of settings worked best to produce a well exposed image with a good depth of field which made the subject stand out from the background whilst maintaining detail in the elements of the background. The wide exposure and slow shutter speed allow a lot of light into the lens and also allow for a good depth of field and accurate motion blur. Combined with the 1/4 ND filter, this produces a well exposed image where the highlights are not overexposed and the shadows are not underexposed - meaning the quality and detail in the image is as good as possible. 


Testing the 'Owl Punch'

As previously mentioned, one of the reasons behind this test shoot was to test this complex scene in the script. Having read through the script, I didn't know how I would effectively capture the scene where Tim ends up punching the owl without the actor actually punching the owl. After discussion with the producer and director, we decided to buy a fake owl which would be interchanged with the real owl during the edit - a role myself and Melissa are sharing. The original plan was to film the sequence on a tripod from 3 different angles (1 long shot showing the owl flying from the owl handler to Tim, 1 medium close up over the shoulder shot of the owl flying towards Tim, and 1 close up shot of Tim punching the owl). The reason behind using the tripod was so that the camera would stay in the exact same position so that 1 shot could be taken flying the real owl and then the exact same shot could be taken with the fake owl being thrown in - the same method was used from all 3 different camera angles (although in the close up shot using the real owl, the subject did not go to punch the owl). The plan was then to map and mask the footage in the edit so that the real owl could be swapped with the fake owl to make it appear that the owl was being punched. I also filmed a handheld shot from each different angle for coverage incase I wanted to put these into the edit. However, it proved unnecessary to map and mask the footage to replace the real owl with the fake owl as with a series of quick cuts, it is unnoticeable that the owl in the final close up shot is a fake owl. The fake owl is only seen for 10 frames so to an unsuspecting audience member, the owl looks realistic. This means I ended up using 2 pieces of handheld footage (1 long handheld shot and 1 handheld close up shot) at the beginning and end of the sequence. The medium close up over the shoulder shot on the tripod captured the movement of the owl best so I decided to use this in the edit but add a handheld effect onto the footage (which was the plan if all the tripod shots had been used if I had chosen to mask the footage instead).


Colour Grading

As well as editing together the sequence, I decided to perform some colour grading to experiment with the look I wanted to achieve. Throughout this project I have been planning on achieving a natural cinematic look - this will be achieved by using colours that are natural to the environment and not too different to the raw footage the camera picks up itself - however, I will then enhance these colours to make the pictures appear more vivid. Through my research into colour I also found that the colours orange and teal are often used in major films to give a more 'epic' look. Whilst I am not attempting to achieve an 'epic' look with VET-MAN, I thought I would take elements of this and apply it to VET-MAN so that it has a cinematic look but in a more subtle way so that the project retains its natural, observational feel.


Above is the original footage and below is the colour graded footage. The main difference is how vivid the colours appear. Where the leaves appear a dirty green colour in the ungraded footage, they have been given a much warmer orange colour in the graded footage. The skin tone of the subject is also noticeably different - whilst the skin in the ungraded footage does have a natural peach / pink tone to it, it is still slightly grey in tone, making the subject a little washed out. Therefore, in the graded footage, I decided to enhance this so that the pink appears more vivid and matured yet still in a natural way.

To achieve this look, I applied an orange / teal LUT at 40% intensity and then altered the shadows to have a light blue tint (+0.2), the highlights to have a light orange tint (+0.4) and the midtones to have a blue tint (+0.1) - combined this creates the natural cinematic look I was aiming for.


Overall I thought this test shoot was successful.

I explored the settings of the Panasonic DVX200 further and was able to alter them to produce the ideal image. I figured out how to change the ISO (which is something I was unable to do during the last test shoot), however, I decided that the original ISO (500) that I had used for the first test shoot actually worked to produced the best exposed image with the least noise. The exposure worked well as when it came to editing and colour grading the footage, my main focus was altering the colours instead of having to compensate for bad exposure. I also experimented with more shutter speeds than the first test shoot and have narrowed down the shutter speed I wish to use to be between 1/50 and 1/100 - I will decide this in the next test shoot. I may decide to use slightly varying shutter speeds depending on the motion within the shot - but again, this will be decided after the next test shoot. Like the shutter speed, I will decide the exact aperture in the next test shoot but following this test shoot I know that I will want to keep it between F5.3 and F7.2 - following my research into DOPs, I know that it is important to choose a consistent aperture as this affects the depth of field of the shots and a constantly varying depth of field may be off-putting for the audience.

The owl punch was extremely successful - even though it was not achieved in the planned method, the alternative method used worked just as effectively to make this scene look realistic. Having tested this, I now have a clearer idea of how to storyboard and shoot this scene in the final project. Initially I would have thought that Tim punching an owl would be 1 or 2 shots but this 5 second screen took 3 different shots to achieve as shown by the example storyboard below.


I also thought the colour grading was successful, I managed to achieve the natural cinematic look I was aiming for. The colours and exposure remained similar to those captured by the camera, however, they appeared more enhanced and vivid.


Tuesday, 30 October 2018

PRE-PRODUCTION UNIT: Researching the Panasonic DVX200

Having performed a test shoot with multiple cameras, I have chosen the Panasonic DVX200 as the camera I will be using for VET-MAN. I therefore have decided to conduct some research into the camera to fully understand all the settings and functions.

All information has been found from the official Panasonic manual "A Guide To The Panasonic DVX200 Camera" by Barry Green.


On the Panasonic DVX200, there are 3 main ways to control the amount of light entering the camera:

- Lens aperture / Iris : The size of the aperture is measured in f-stops. The smaller the f-stop, the wider the aperture and therefore more light enters the lens. The larger the f-stop, the smaller the aperture and therefore less light enters the lens.

It is recommended with the Panasonic DVX200 that when shooting in UHD or 4K you should stay between f/2.8 and f/8.0 to avoid a soft image. If you go deeper than f/8.0 (e.g. f/11 or f/16) the image will be a lot softer due to diffraction.

- Shutter Speed : This controls the amount of time light is allowed to enter the sensor - the longer the shutter speed, the more light is allowed to enter the sensor. The shorter the shutter speed, the less light is allowed in the sensor.

It is important not to use a shutter speed slower than the frame rate as this will result in frames being dropped.

- Neutral Density Filters (ND) : They darken the incoming light without affecting the quality of the image. The DVX200 has three in built ND filters which allows different levels or light cutting.

The settings are as follows:

Off: No ND filters

1/4: Reduces the amount of light coming into the camera by two stops.

1/16: Reduces the amount of light coming into the camera by four stops.

1/64: Reduces the amount of light coming into the camera by six stop.

How to manually judge the correct exposure

As the LCD isn't always the most reliable in displaying the exposure of the footage, I decided to look into the other tools the camera has to offer.

Professional monitoring tools use the IRE scale which measures video brightness from 0 (pure black) to 109 (clipped white).

Zebras : This is an overall on the video monitor that shows up any time an element in the image is brighter than the predetermined level (that you set before shooting). Generally, you do not want to see  105+ zebras anywhere on the screen and when shooting a caucasian face you do not want to see 70+ zebras on their face.

Y Get Marker : Goes hand in hand with zebras. Marker tells you what brightness is occurring at centre of screen.

Waveform Monitor : This tells you the brightness of the image in a 3D way as opposed to a 2D way (like zebras). Shows the relative brightness across screen and how many pixels in each column are at which brightness.

The Histogram : This is a graph that appears to help judge proper exposure.

An external monitor can also be used but as I will be shooting handheld for VET-MAN, I will use the inbuilt LCD screen for ease of use and mobility.

Autoexposure can also be used, however, this would give me less control over the way the image looks, therefore, I will be deciding the settings manually.

Another way to increase the brightness of the image is to adjust the gain (or ISO) of the picture. This works as an electronic amplification of the video signal to artificially make the picture brighter. However, as this is an artificial means of increasing the picture brightness, it means the more gain you apply, the more electronic noise there is in the picture. The best images come with as low ISO as possible. Increasing the gain also does not increase the detail seen in the picture - gain only amplifies the signal the camera is currently seeing, it cannot add detail that can't be seen due to underexposure.

Further to the exposure of the picture, there are more elements to consider for a good quality shot. White balance is important for the colour temperature of the footage. White balance needs to be set for each environment due to the changing colours present - the white balance determines how the camera sees white in each environment with different lighting. To set the white balance, a white card should be held some distance from the camera (preferably near the subject's face), the camera should then be zoomed and the white balance button pressed once the white card takes up the entirety of the frame. This sets how the camera sees white for this environment - it should be set for every environment. The DVX200 is also capable of doing a black balance - to perform this function, the white balance button should be held down. This shuts the iris and the camera analyses the signal to determine the black balance.

The focusing of the image is also important to ensure the best quality image. However, the LCD screen and viewfinder do not have enough pixels to show the imager sharply - this is why the camera has additional settings to aid this. The camera has the 'Expanded Focus Assist' and 'Peaking'. The Expanded Focus Assist magnifies the centre of the frame, allowing for more detail to be displayed. However, this is only useful when setting up the shot as it cannot be used during recording. Peaking can be used during recording, this option draws an outline around objects in sharp focus meaning that it will be clear during the actual recording which aspects are in and out of focus.

Another technique to ensure the best image quality is shooting in 4K. Shooting in 4K means that the footage can be displayed on larger displays without reducing the quality of the image. It also future proofs the footage by shooting in as high quality as possible - this means that even if VET-MAN isn't intended for 4K screens, it is capable of performing on these screens in future. Shooting 4K also ensures the sharpest and clearest HD images possible when shrinks down to HD size as the source image is larger. A further benefit of shooting 4K then down sizing to HD is the reduced noise - this therefore increases the image quality. This also allows for more scope during the colour grading process.

Understanding these settings will allow me to shoot VET-MAN in the best way possible. I will use this information during the further test shoots.

Sunday, 28 October 2018

PRE-PRODUCTION UNIT: Storyboarding - Research

Purpose of Storyboarding - The main purpose of the storyboard is to outline how the production will be achieved visually. This is usually accompanied by a shot list which details each shot, shot type, framing, camera movement and description of the shot.

Process of Storyboarding - Information from Professional Storyboarding: Rules of Thumb by Sergio Paez and Anson Jew

- The first thing to do is to read the entire script - re-read the entire script so that you know the sequence of events including the who, what where, when and why. Need to know how all the characters are feeling internally about what's happening and how they are outwardly acting upon those events.

- Break down the script. Prioritise what is important to show in a scene. Visually scan the script and list all people, places and props that will appear through the drawings. 

- Make notes on the script to decide which shot type will be appropriate for the events and movement involved.

- To accompany the storyboard, an overhead sketch of the architectural view can help to figure out the staging of a scene - and therefore help how the storyboard is drawn.

e.g.


- Pick out every word from the script. One block of description may need more than one shot to go alongside it - e.g. if a block of description is establishing the scene of the action, multiple establishing shots may need to be used to establish the locations, characters and events involved.

- Dialogue pieces may call for reaction shots as well as the action shot of the character speaking. Read the dialogue aloud and determine whether multiple shots are needed for coverage of this scene.

- The storyboard must ensure it fulfils the story point of the scene. Every scene and every image has a specific reason for being incorporated into the story - this reason must be clear to the audience. Anything that distracts from the story point should be cut.

- Identify the subtext in the dialogue and who is the focus or sympathetic character. This will help the staging to reflect the acting in the dialogue and therefore help the planning and storyboarding of the scene. Finding the subtext adds layers to the scene as a character may not say how they are feeling but can show visually (which can be depicted through the storyboards).

When it comes to actually drawing the storyboard - there are a few simple guidelines to follow. You do not need to be a storyboard artist to create a simple storyboard as a DOP but certain elements must be clear so that you can work effectively off the storyboard. The storyboard must also make enough sense to the director so that they can approve it before it goes into production.

Guidelines:

- Give figures solid poses with clear silhouettes
- Add simple tones - no more than 2-3 grey tones
- Only use colour when necessary
- Limit the use of arrows - add more panels to show movement to help action flow (but obviously use arrows if necessary to the shot).

When going through the script, there is a simple list of questions that can be used to aid making decisions about the storyboard:

About the scenes:
- How many are in the scene?
- What is the situation at the beginning of the scene and how is it different at the end?
- Who is affected by this change?
- How does this person feel about it?
- How does this scene affect the scene after it?
- How does it affect the one before it?
- How has this scene been affected by the one before it?

Within a scene:
- Who or what are we most interested in at this moment? What's the main focus?
- Who is in control of the situation?
- Where are we? Have the characters moved? If so, where?
- What's the subtext? What is being said or done and what does it really mean?
- What nonverbal cues might illustrate what's really going on?

Storyboards can be created in different ways, below are some examples of different types of storyboard:

1. Storyboards can be sketched with detailed outlines of scenes in order to display how the visuals of the production pan out. Although these sketches are simple, they are detailed in the amount of the scene they show (i.e. they show the objects and environments included within the scene) they are labelled and scaled so that they accurately show how the production will be realised.


2. Storyboards can also be simplified so that the main detail seen is the subjects / characters of the scene (i.e. the environment in which the scene takes place is not shown in detail). This is then compensated for by writing where the scene takes place in the description beneath the shot. This storyboard also features a separate box for the shot type in order to clearly display what is intended.


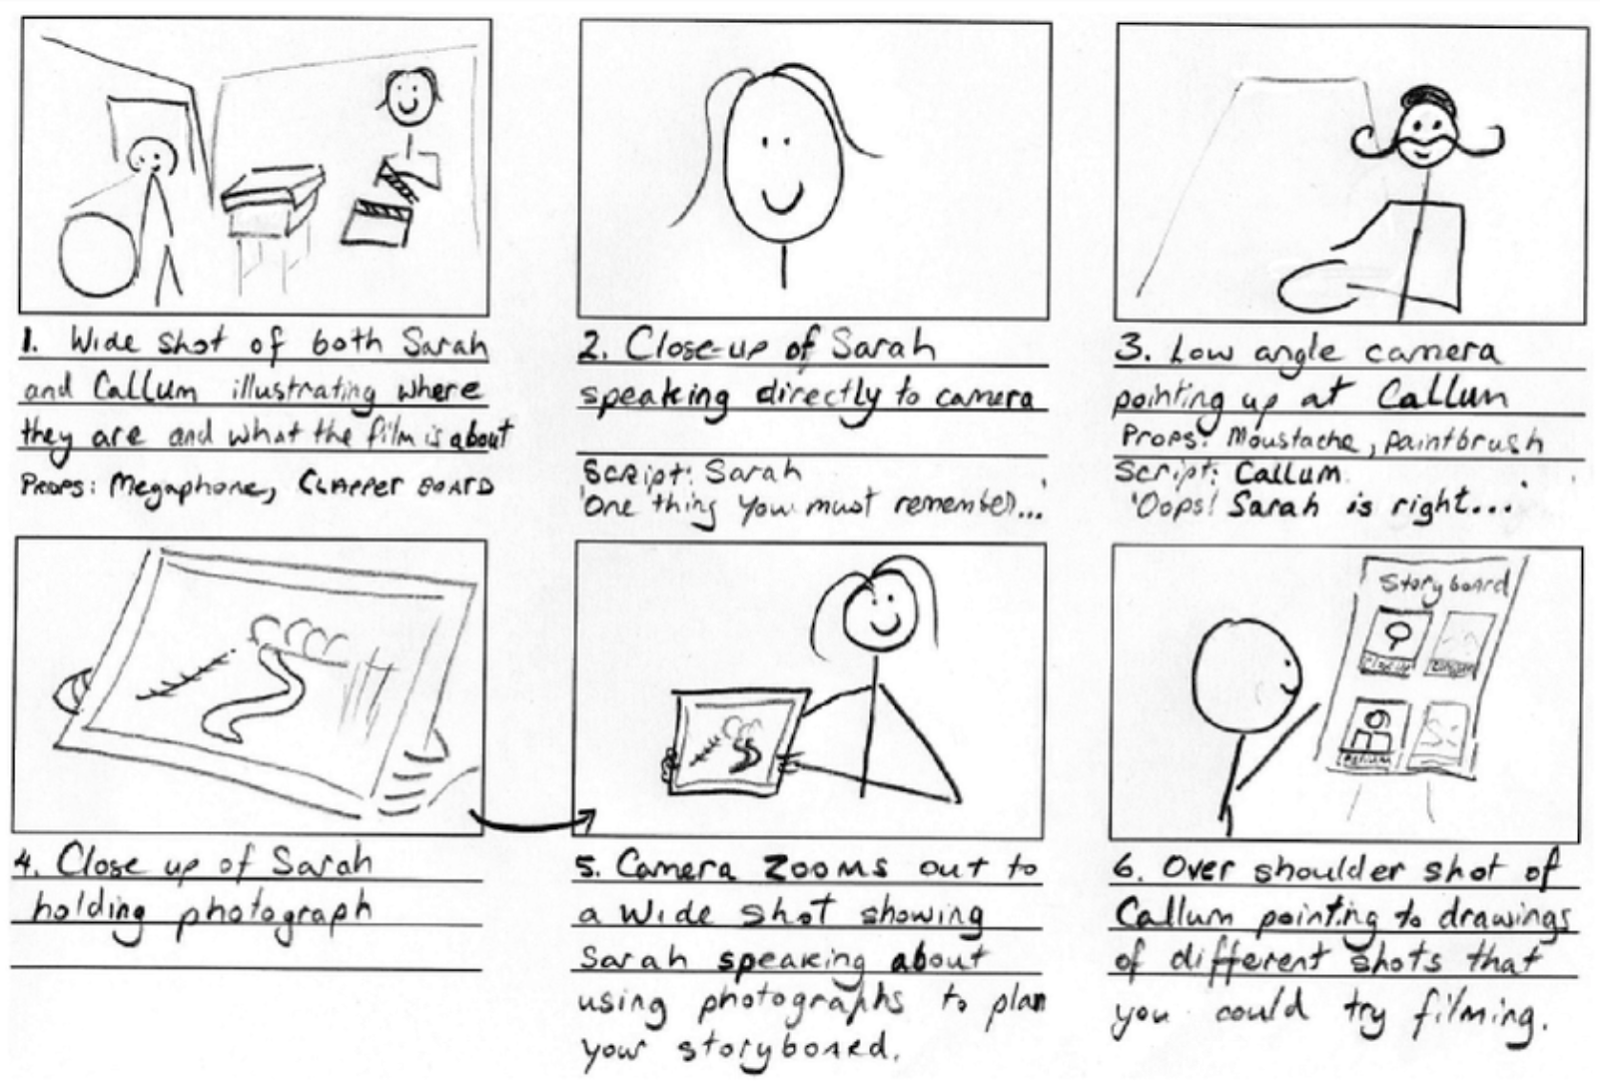
3. This storyboard is very simplified in terms of the drawings shown, however, what the drawings consist of is detailed below the shot. Furthermore, even though the shots are drawn very simply, they are drawn to scale (i.e. sarah appears small in the wide shot and then the closeup shot of sarah fills the frame). Although the viewer of the storyboard doesn't get as much detail into the visual of the scene, they are able to understand the direction the visuals will take.


4. Whilst this storyboard is also simple in the fact it uses stick figures, it uses arrows and labels to detail how the scene will pan out. This storyboard also uses panels of different sizes to show how the action within the scene changes - this is another option when storyboarding.


5. Another option when storyboarding is drawing incredibly detailed shots in order to clearly display how the visuals of the narrative will pan out. These drawings can also be continued outside of the box to display how the shots will continue and move - arrows are also used to show the direction of movements of both the characters and the cameras. Due to the increased visual detail, less detail is included in the descriptions.


6. Another option when storyboarding is an animated storyboard. This is another option which allows more detail to be displayed to give more of an idea how the visuals of the narrative will pan out. These animated scenes are accompanied by labels beneath them to detail the action.


I will use this research to inform the creation of my storyboard for the production of VET-MAN.