The research, development and product
As a group we decided to continue our idea of VET-MAN from the Transition Unit and develop it into a final major project. However, together we decided that a mockumentary approach was the wrong way to go, therefore, we opted for a sit-com instead. I decided to continue with my role of Director Of Photography.
To understand what was required of me within my role I researched the role of the DOP and three DOPs (Polly Morgan, Petra Korner and Jamie Cairney), contacting all of them for additional information and advice. This helped me to work out what to prioritise and what was necessary to prepare in the pre production of a project. As well as this, I conducted some research into relevant programmes that would aid me in the development of VET-MAN. I chose programmes that used a similar filming style to my desired handheld, natural method but with different methods of delivering the comedy so that I could establish how appropriate this filming method would be for the production of VET-MAN. I researched The Thick Of It as the programme which had the most similar filming style to my desired style, I then also researched I'm Alan Partridge and Brooklyn Nine Nine which had similar handheld styles yet with slight differences which are outlined in these posts. I then also research Black Mirror (in particular the episode Shut Up and Dance) to look at different cinematography styles and to see how different moods can be evoked through different cinematography methods. Furthermore, I also researched the sit-com as a genre which involved looking into sit-coms such as Big Train and Not Going Out. All of this research combined helped to inform my filming style, what to test in my test shoots, which equipment to use, how to light the production, how to construct the mise-en-scene of the production, colour grading decisions and how this affected the telling of the story of VET-MAN - all of these decisions into the cinematography of VET-MAN and why I made these decisions are displayed in my Director Of Photography statement.
One of my biggest roles as DOP was test shooting so that I could make the appropriate decisions into how VET-MAN should be shot and displayed visually. These test shoots allowed me to narrow down which camera would be most appropriate to use to shoot VET-MAN, how to light the scenes and also gave me some practice at blocking and shooting certain scenes with the director such as the opening scene and the owl punch scene - helping me to solidify my storyboarding and shot list choices and also to see how feasible it is to film the selected scenes in the proposed style.
Another big role of mine as DOP was creating the storyboard and shot list for the production. This helped to lay out all the cinematography decisions for VET-MAN in order to clearly display how the production would be shot.
Overall, I feel the development of the pre-production of VET-MAN was successful. I feel the research I performed lead me to test the correct things in the test shoot and, therefore, make the best decisions into the filming style and which equipment to use to achieve this. The storyboard and shot list clearly lay out how each scene should be filmed which will allows the intended cinematography for VET-MAN to be displayed - these also provide a lot of information into the camera movements, shots and lighting required for each scene, meaning the producer can use this to schedule the shoot days - making the collaborative element of this unit smoother.
Strengths
- Gained first hand insight from two young female DoPs which helped to focus my ideas. The main piece of advice given from both was that the story should be central to all decisions made - this helped me to focus my ideas and keep asking myself how my decisions related back to the story I was trying to tell. From this advice into prioritising the story, I was able to solidify my choice in natural handheld camera style and the realistic yet cinematic look (which would be depicted through the colour grade and aspect ratio) as this reflected the naturalistic, deadpan, dark comedy of VET-MAN.
- Gained insight from the DoP of my main inspiration (The Thick Of It) for the filming style of VET-MAN. This helped to both give me more ideas into the production of VET-MAN and reinforce ideas I already had. Jamie Cairney revealed that the production of The Thick Of It mainly relied on natural or practical lights - and if this failed to provide enough light for the scene, lighting was rigged overhead or through windows to mimic natural or practical lighting in a way that didn't interfere with the filming process. As Cairney revealed that a lot of the action was captured spontaneously without blocking, it was important that lighting equipment would not be captured by the rapid, unpredictable camera movements. Although VET-MAN is slightly more planned and blocked (meaning that the positions of lighting equipment can be such that they do not interfere with the shots), due to using some similar techniques such as quick pans and crash zooms, it is good to limit the amount of equipment that could be accidentally captured in shot to avoid re-takes of scenes and lengthening the production process. This insight into the production of The Thick Of It also proves that a good quality, natural look can be achieved using mainly natural and practical lighting - it does not HAVE to be supplemented by artificial lighting equipment.
- The three test shoots helped to decide equipment would be most appropriate for the production of VET-MAN and how best this equipment would be used to capture the desired shooting style. The first test shoot was very successful and enabled me to narrow down which camera out of the Panasonic DVX200, JVC GY-HM850 and Canon 7D would be best for shooting in a handheld, natural, observational style with crash zooms and panning. I compared the cameras in terms of the quality of footage they produced, the ease of use, the weight of the camera, the features of the camera, the stability of the camera and the scope for the colour grading process - this lead to me picking the Panasonic DVX200 after thoroughly testing all the cameras. This thorough testing has meant that I have chosen the best camera for the production which will enable me to achieve the desired realistic yet cinematic look. The second test shoot enabled me to test the settings of the camera further and also work out how to shoot a complex scene within the production. Working out how to film this scene meant that I could visualise how this action within the script was going to pan out and, therefore, allowed me to storyboard this piece of action better so that I will have a clear idea of how this will be filmed in the actual production. The final test shoot allowed me to test lighting in order to find the best lighting for the shoot - I tested reflectors and LEDs in different locations and lighting situations to work out which sort of lighting would be needed for each scene to maintain the natural look of the production. By performing these in-depth test shoots, I have ensured that the equipment I have chosen is the most appropriate for the production and will help me to achieve the best result.
- I included detail in the storyboard and shot list into how the scenes will be lit and where the natural lighting will be coming from. This helps to give a clearer image of how the scenes will appear visually, not just in terms of how they are shot with the camera movements etc, but how the lighting will affect how the characters appear. Including this detail also helps the producer to schedule which equipment is needed for each scene so that she can ensure this is available to use - ensuring a smoother production.
Weaknesses
- The storyboard and shot list are based on the third draft of the script, meaning that they will need to be developed further before the project can be taken into production. Whilst the storyboard and shot list are sufficient in mapping out the shot types and camera movements within the scene, certain things have changed between the third draft and final draft which means the storyboard and shot list will need to change accordingly. However, the third draft storyboard and shot list still depict the rough storyline of VET-MAN and the camera movements and shot types will remain largely similar which means these versions of the storyboard and shot list still give a clear vision of how the cinematography of VET-MAN will pan out - I could just develop this further by developing the final draft of the script into a shot list and storyboard.
- My chosen cinematography style is quite difficult to achieve as I have chosen to combine two opposing styles - realistic and cinematic - therefore, it may be hard to achieve the right balance. I have chosen to film in a high quality resolution, colour grade using a hollywood standard scheme of teal and orange and crop to an aspect ratio of 21:9 in order to give VET-MAN a cinematic look, yet the main things keeping the essence of realism are the shot types and camera movements - this suggests there may be an imbalance between the two styles and VET-MAN may look more cinematic than realistic but this just means I need to be more aware of my camera movements and ensure these are performed as proposed to keep the realistic style of the production.
- I fell slightly behind schedule with storyboarding, meaning that only one storyboard of the production could be developed. Ideally, I would have liked to complete a storyboard on the final draft of the script but this was also dependent on collaboration with the writer. If I had kept on schedule, I may have been able to compromise my original plan and still develop a storyboard on the fourth draft of the script as well as the third as this would have given an even clearer direction for the cinematography of VET-MAN, however, there was not time to do this. Despite this, my storyboard and shot list of draft three of the script still depict a clear idea of the story, I would have just liked for it to be more refined.
What did I learn?
- From my research into Polly Morgan, I found that all decisions to do with the look and aesthetic of the production must take into consideration the story you are trying to tell. As she said; "all choices come in response to the STORY. What are you trying to say? How are you trying to make the viewer feel? How can you use the tools available to you to achieve that?" - This advice really helped me to put consideration into all the choices I made. I have chosen to shoot in a handheld, observational way BECAUSE this adds to the realistic nature of the production which helps to shift the focus onto the deadpan, satirical humour. I have chosen to use the Panasonic DVX200 BECAUSE the controls of the camera are accessible and the weight of the camera is not too much for the handheld, observatory camerawork. The camera also films in 4K which gives good quality for a cinematic look and gave the most realistic colours / exposure when compared to the other cameras in the initial test shoot. I have chosen to colour grade the project in orange and teal complimentary colours BECAUSE this adds to the cinematic elements of the product but I am using these colours at a reduced intensity to keep the essence of naturalism. I have chosen to crop the product to an aspect ratio of 21:9 BECAUSE this adds to the cinematic essence of the film as this gives a wider field of vision, however, when combined with the realistic camerawork and colourings, this helps to produce the realistic yet cinematic desired look.
- Artificial lighting is sometimes necessary even when creating a natural looking production. Initially, I hadn't planned on using lighting equipment as I wanted the production to have an entirely natural feel, however, after testing lighting in the test shoots, it was apparent that natural results could be achieved using the lights. It was also apparent that natural or practical lighting in some of the locations would not have been sufficient (e.g. the practical lighting within the pub was far too dull, leaving the subject completely cast in shadow) - without performing this lighting test shoot, I would have planned to use natural lighting and, therefore, would have produced a lower quality product. This has shown me the importance of test shooting and not assuming that to produce a natural looking production, everything needs to be natural - additional equipment can be used in clever ways to produce an enhanced yet natural looking result.
What could I develop?
- I need to have better time management so that I can achieve the things I set out to (e.g. developing a further storyboard). If I hadn't fallen behind with the development of the storyboard, I would have been able to develop a further version and, therefore, had an even clearer idea of the cinematography involved in VET-MAN which would have ensured for an even smoother production process. However, due to falling behind schedule, the only existing storyboard for VET-MAN is based on version three of the script. I will now develop a storyboard and shot-list based on the final version of the script to ensure VET-MAN can go straight into production.

Sunday, 9 December 2018
Wednesday, 5 December 2018
PRE-PRODUCTION UNIT: Director Of Photography Statement
As the director of photography for VET-MAN, I am in charge of the overall look and aesthetic of the production. My responsibilities include; determining the shooting style, deciding which equipment would best fulfil this style, working out how the locations will affect the use of the equipment, how I wish to colour grade the footage to achieve the desired look within the chosen filming style as well as providing the shot lists and storyboards for the production.
The Shooting Style
Having researched the shooting style of various different situation comedies, both English and American, I have decided on a natural yet cinematic observational handheld style, characterised by lengthy sequences without cuts and using crash zooms to emphasise key points within the narrative. Even though shooting handheld has been an option since the invention of cameras, "the use of hand-held camera as an intentional aesthetic choice developed during the cinéma vérité style of the 60’s French New Wave movement ... Since then, the technique has been used to heighten tension and give realism to countless films and television programs." [Walsh, 2012]I have decided this would be most appropriate for VET-MAN as the realism of the piece greatly impacts the comedic effect of the dialogue. As Polly Morgan, a young female director of photographer in charge of the cinematography for Call The Midwife and American Horror Story, said; "all choices come in response to the story. What are you trying to say? How are you trying to make the viewer feel? How can you use the tools available to you to achieve that?" [Morgan, 2018] By shooting in an observational handheld manner, VET-MAN is given an almost documentary-style feel, making the audience believe this ludicrous situation of a failed vet taking his career into his own hands could actually happen in reality. Therefore, the use of crash zooms to emphasise certain actions and reactions is integral to the piece as it heightens the comedic value whilst maintaining the deadpan, macabre tone that is instilled throughout via the dialogue and actions of the characters and the observational shooting style. As it has been noted' "the zoom forces our attention on a particular area of the frame" [McGregor, 2017], showing how the technique of zooming is effective in ensuring the audience recognise the comedic elements within the scene as these will be highlighted to them through the use of zooms.
This technique can be observed in sit-coms such as The Thick Of It and Brooklyn Nine Nine (the former being an English sit-com and the latter being an American sit-com - showing that this technique can be carried across different styles of sit-com and still prove to be effective).

In The Thick Of It, the zoom is used to emphasise Malcolm being unimpressed and annoyed. Even though the starting shot was already a medium close up, meaning that the facial expression is clear to the audience, zooming in to a close up accentuates this emotion further as the audience is being physically drawn in. This also makes it very clear to the audience which part of the frame should be receiving their focus.

Whilst Brooklyn Nine Nine does use the same technique of crash zooming within the shot to emphasise certain aspects and emotions - a similar cinematic technique is also used where a slight jump cut is used to transition from a medium shot to a close up shot to achieve the same effect as the zoom shot of emphasising the emotion.
I will be using a mixture of these two techniques in VET-MAN to emphasise the characters' actions and reactions.

This technique can be observed in VET-MAN where blood splatters on Tim's face as he carries out a failed operation. The zoom from a medium shot to a medium close up will help to focus the audience's attention on the blood splatter.
Another use of the zoom technique that I will be utilising is using the zoom as a reveal. This can be observed in sit-coms such as Alan Partridge - an English sit-com. This proves effective in building anticipation among the audience as they are being prevented from viewing the full picture which builds suspense and excitement for what is to come.

As shown in my research, this technique is used regularly in Alan Partridge but is especially effective in the ending scene of 'Watership Alan' where it is presumed Alan is sitting on a chair and drinking a beer, whereas, he is actually shown (through a zooming out shot) to be sat up in a stretcher as someone else pours the pint into his mouth - adding to the shock factor and, therefore, heightening the comedy of the situation within the scene.
My use of this technique will be seen in shots such as when Tim and Luke appear from behind the owl enclosures to continue their scheme. At the beginning of the shot the audience are left with the question of why the owl is acting in such an irrational way with Molly, however, once the camera zooms out to reveal the entrance of Tim and Luke, the audience soon realise their interference has something to do with it.

The action-heavy scenes will be comprised of a larger variety of shots than the dialogue scenes to aid the pacing of the production. During dialogue scenes, the majority of the comedy is being delivered through the characters' dialogue and their reactions to the dialogue - this can be captured through mainly medium and medium-closeup shots as this will ensure the characters' expressions are clearly visible to the audience. Action-heavy scenes require more shots in quicker succession to increase the pacing and enhance the excitement for the audience. This faster pacing also builds up the tension and anticipation so that when the comedy is delivered, it has the maximum impact on the audience.
This technique can be observed in the three aforementioned sit-coms and can be observed in VET-MAN in scenes such as when Tim punches the owl out of the air. As storyboarded and tested in test shoot 2, in the seconds in which the owl flies towards Tim and he punches it, 4 different shots are used (a medium-closeup zooming in to a closeup of Tim's face to show his reaction, a medium shot to show the owl flying towards him from the side, and over the shoulder medium-closeup to show the owl flying towards Tim and a medium-closeup zooming in to a closeup of Tim as he punches the owl out of the air). Together, this allows a vast amount of coverage of the scene whilst also speeding up the pace to reflect the frantic nature of the character's actions.
As well as zooms, in VET-MAN I will include camera movements such as tracking and panning. This works to follow the characters through the scenes without cutting to different angles to observe this action.

This technique is especially prevalent in The Thick Of It where it is used to follow the characters through the scenes, making as little cuts as possible. This helps to transport the audience along with the action so that they are experiencing everything along with the character. On top of this, the minimal cutting allows for a more observational, natural, realistic feel which will aid the cinematic yet realistic style of VET-MAN.
Colour and Tone
The colouring of a production helps to connote a lot about the story. Having researched colour theory, I found that there are five common film colour schemes. The first being a complementary colour scheme which entails using two colours on opposite sides of the colour wheel to form a complimentary pair. The second is an analogous colour scheme where colours that sit next to each other on the colour wheel are chosen to form the colour scheme of the film and is usually used to create harmony in a colour palette. The third technique is a triadic colour scheme which takes three colours spaced evenly around the colour wheel and one is usually most dominant whilst the others are used for accent. The penultimate colour scheme is a split-complimentary colour scheme which is similar to the complimentary colour scheme but uses the two colours next to the opposite complimentary colour instead. Finally, the last colour scheme is the tetradic colour scheme which consists of four colour made up of two complimentary pairs, however, one pairing is more dominant. When deciding on the colour scheme for VET-MAN, I had to decide which scheme would suit the tone and story of the production best.

For VET-MAN I am using a complimentary colour scheme in order to tie in with the natural yet cinematic look that I am hoping to achieve, particularly focusing on the orange and teal colours. This colour scheme is often used in cinema because "if you take two complementary colours and put them next to each other, they will 'pop'", [Hoad, 2010] enhancing the visual quality of the production by highlighting the contrast between these colours. I will be taking inspiration from Polly Morgan's colour palette in Call The Midwife as she refers to her personal style as "cinematic naturalism" [Morgan, 2018] and this is very similar to the desired realistic yet cinematic look for VET-MAN.
Therefore, I have borrowed elements from the colour grading of The Thick Of It as this uses grading to create a completely natural look. The skin tones are peach with a slight grey undertone to reflect the office lighting. The walls are a grey / cream colour and the shadows are a dull dark blue or brown. All together this creates a natural, realistic look.

In VET-MAN I am taking inspiration from the orange and teal colour grading of Polly Morgan to create a cinematic look but I will be combining it with desaturated undertones such as those used by Jamie Cairney in The Thick Of It to bring the natural, realistic feel to the production.

This can be seen in the colour grading of my test shoots. As displayed above, in VET-MAN I will enhance the orange and teal colours in order to make the production 'pop' in a cinematic way, however, I will introduce desaturated undertones to the skin and environment to ensure the realistic tone is not lost.
Lighting
The lighting of the production also contributes to the entire look and aesthetic. Due to the desired realistic feel of the production, I didn't want to use artificial lighting as I feel this is usually detectable. However, after test shooting both interior and exterior scenes, I thought of a compromise which introduced equipment to help light the production whilst still retaining the natural quality.
I wanted to emulate lighting that can be observed in sit-coms such as Big Train. The lighting is very natural in order to convey a realistic and observational feel.

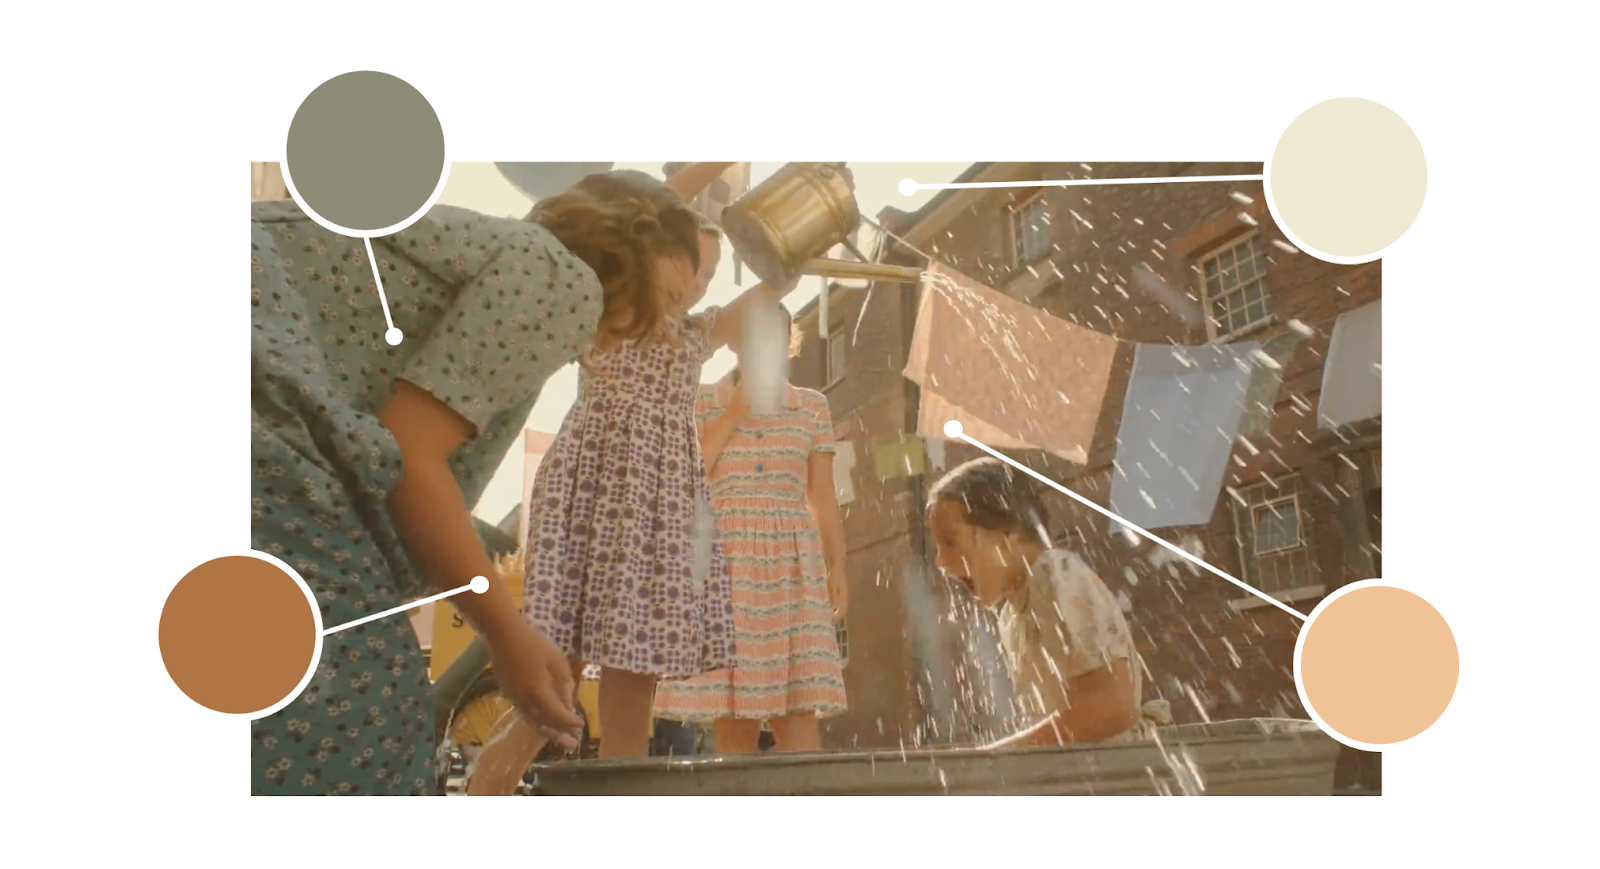
It is evident that lighting equipment is required for scenes such as this because the window behind the character would naturally silhouette his face, however, his face is still clear and visible to the audience. It is possible to achieve such a look using either a light or a reflector as a light would provide additional lighting to the scene to compensate for the natural light coming from behind, whilst a reflector would bounce the natural light back into the scene.
Prior to figuring out which lighting equipment I would need, I had to work out how each location was affected by the natural light.

I created maps of each location to display where North, East, South and West were so that I could determine how the light would affect the locations. As each location proved to receive a lot of natural light during the day (as light was able to reach the locations from the South / East directions) I am using an Interfit Reflector to light daytime scenes (both interior and exterior) as this reflects natural light back onto the characters' faces in a way which looks natural and enhances the quality of the images.

The lighting test shoots help to demonstrate how the same subject and location is affected by different lighting equipment. As shown above, the best result was given by the reflector as this illuminates the subject naturally using the natural light entering the location from the north-west facing window. All locations shot in daylight have been mapped to highlight how the sun will affect the location so that a runner with the reflector can move according to where the scene takes place and how the sun enters and moves through the location.
For night shoots, artificial lighting is essential due to the dim natural lighting conditions. As I found in the test shoots, two aputure LED lights (one on a high setting and the other on a medium setting) both set to a warm colour temperature work best to emulate the warmth of street lighting which adds to the natural look of the entire production. Practical lighting will also be used in the night locations (either street lighting or interior room lights) to aid the realistic feel of the production as this lighting would be present in real life. The effect of using a combination of practical lighting and artificial lighting can be seen through the lighting test shoots.

Aspect Ratio
Aspect ratio plays a big part in setting the tone of VET-MAN. As the desired tone is cinematic yet realistic, I conducted some research into cinematic aspect ratios. I narrowed my options down to 16:9 (a common aspect ratio for widescreen HD TV) and 21:9 (a common aspect ratio for cinema). In VET-MAN both aspect ratios will be used, however, the 16:9 aspect ratio is only used for the first shot before Tim steps into the scene. Once Tim has stepped in, the production is letterboxed to form a 21:9 aspect ratio.

This wider field of views helps to "emulate a perspective that [is] in many ways closer to what the human eye perceives." [Kroll, 2014] In cinema this is done through anamorphic lenses which stretch the image vertically so that when it is projected back, it is pushed down to a wider aspect ratio. Giving VET-MAN a 'cinemascope' look adds to the cinematic yet realistic tone - the colour grading and shooting style help to convey the realism of the piece, whilst letterboxing the production to a 21:9 aspect ratio adds to the cinematic feel as it imitates a wider field of vision.
Frame Rate and Quality
I will be shooting VET-MAN in 4K with a frame rate of 24 using the Panasonic DVX200. The reason for this is that 4K allows for a better-quality image despite whether the production is shown on a 4K capable screen on HD capable screen. This is because when the image is shrunk down for a lower resolution screen, the noise within the image reduces and the image becomes sharpers, making it appear better quality. This also future proofs VET-MAN for if it is shown on a 4K-ready screen. The noise reduction is also a good tool as VET-MAN includes scenes shot at night which will require using increased gain which is usually accompanied by noise - however, shooting 4K with this camera will prevent this.
As well as shooting in 4K, filming in 24 FPS will help add to the cinematic look of VET-MAN as "the vast majority of films and movies are shot at 24 FPS" as this "closely [resembles] the 'frame rate' your eyes see in". [Coburn, 2018] Combined with the natural and observational shooting style, this will help to create the realistic cinematic look I envisaged for VET-MAN.

Saturday, 1 December 2018
PRE-PRODUCTION UNIT: Shot List
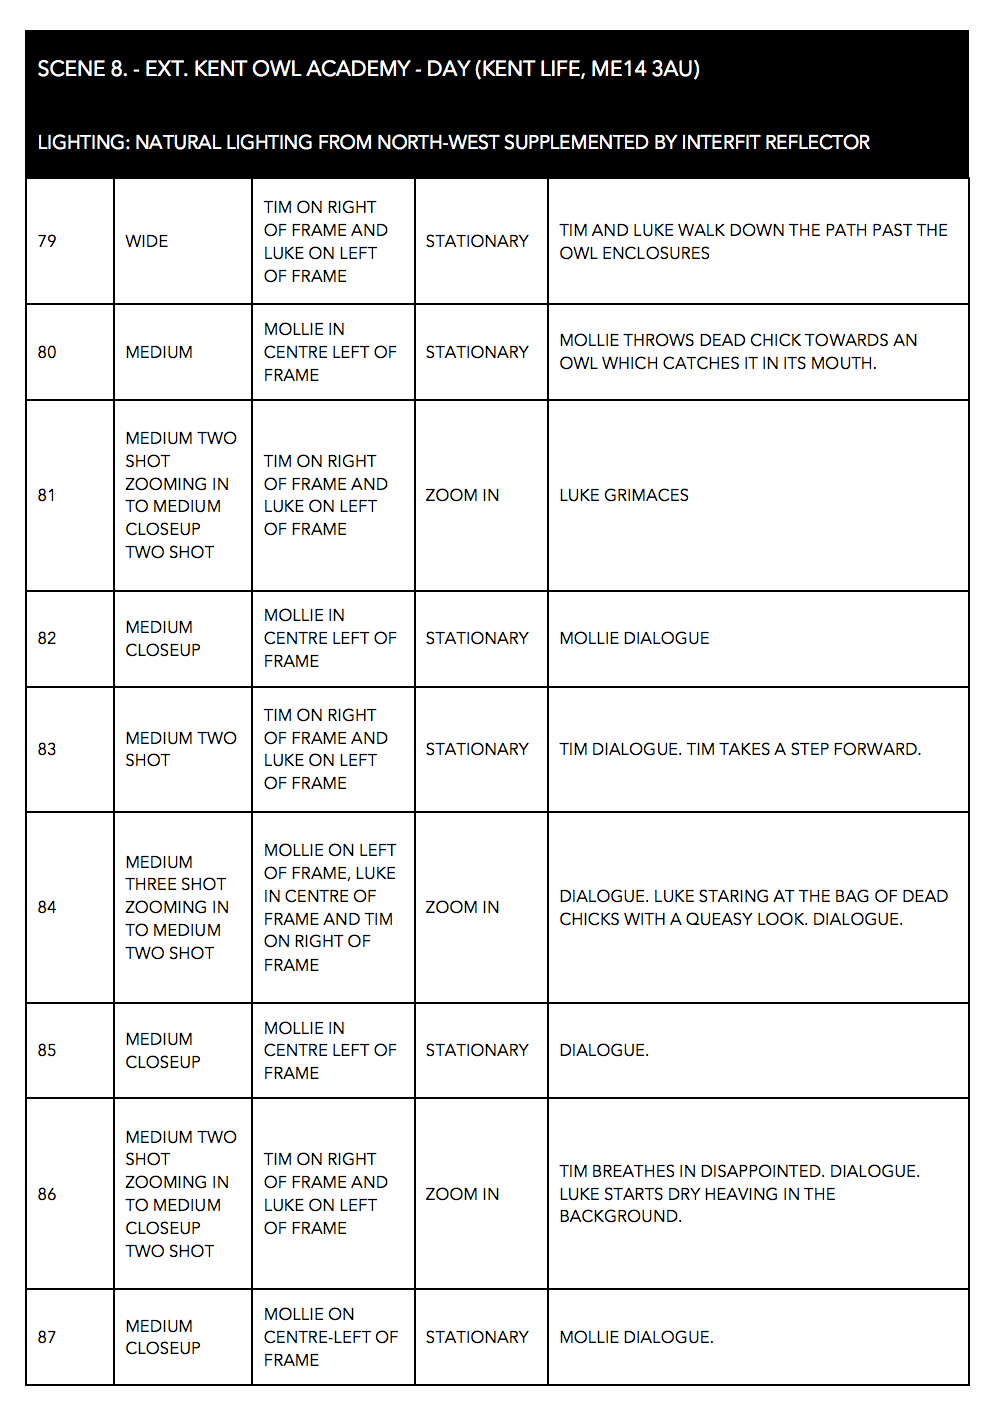
To accompany the storyboard, I created a shot list to detail each shot that will make up the production of VET-MAN. This gives an objective list of all the shot types, framing, movement and description of the contents of the shot. On top of this, I have included how each scene is lit. This is so that all members of the crew know what is required for each scene so that the production can run as smoothly as possible. The producer will use the shot list to schedule which actors and equipment are used for the production of each scene.
The shot list was created on the third draft of the script and will be developed further based on the final draft of the script. This draft was developed enough so that the outline of the story will remain the same and therefore the shooting of each scene should remain fairly similar - it is just the contents of the scene which may change. This may mean a slight difference in shot types used as certain bits of the scene may get cut which may mean certain camera movements such as crash zooms may not be necessary to capture them - the shot list will be adapted to take into account the changes in the final draft.
The director has told me that the scenes will remain in the same order and take place at the same time of day as planned - this means the only things that will change are the number of shots within the scenes, what they capture and how they are captured. The information to headline each scene will remain the same.


Friday, 30 November 2018
PRE-PRODUCTION UNIT: Test Shoot 3
Blocking and Lighting Tests
The purpose of this third test shoot was to block out a scene in order to work out how the action would pan out based on the script and storyboard. As I created the storyboard before the director blocked out the scene, the blocking is slightly different to the action within the storyboard. I will update my storyboard based on this blocking and on the final version of the script (as the current storyboard is based on the third version of the script). The main purpose of blocking this scene was to help me visualise how it would pan out with the cinematography and for the director to work out the camera and character positions.
This blocking test shoot also enabled me to see how practical my proposed shot types were and to see how well this fit in with the desired shooting style. Through doing this test shoot, I found that the shooting style worked well to embody the natural, realistic feel as the pans and zooms enabled me to achieve a spontaneous, observational look. As well as this, performing this test shoot enabled me to try out using the camera in the exact shooting style I am aiming for. The purpose of the other test shoots has been to test which camera would be best for the desired visual look or to see how specific scenes pan out, however, this test shoot enabled me to put the entire shooting style together to see how achievable this is. As a result, I have found that this shooting style works very well using the Panasonic DVX200 as the controls are all very accessible, enabling me to achieve the proposed shots.

Despite going for a realistic style, I needed to test lighting as this can still be used to achieve a natural result. Following the information provided by DoP Jamie Cairney, I tested the artificial lighting equipment in ways that mimicked the natural or practical lighting of the setting in order to maintain the realistic, observational style.
Before testing the lighting, I created lighting maps which are available to see in the location mapping blog post. This helped me to see where the natural lighting in each location would come from by mapping out where north, east, south and west were in each location - this would tell me how the light moves throughout the day and, therefore, how each location is affected by this. I will then combine the information about where the natural lighting is coming from with the chosen lighting equipment in the shot list to explain how each scene will be lit.
Firstly, I tested different lighting in a naturally well lit interior environment. For this location, the natural lighting came mainly from the south-east facing double doors at the back of the location and the west-north-west facing windows at the front of the location (behind the subject's head).
I set the Panasonic DVX200 to some pre-tested settings that I knew would work well to produce a well exposed image - this way I could have an objective view on which lighting equipment worked best. The settings I used were: ISO 500, aperture F/6.4, shutter speed 1/60 and no ND filter. These settings can be seen naturally in the first image labelled 'no equipment'. This produced a well exposed yet flat image.
Next, I tested using an Interfit reflector to bounce the natural light back onto the subject. This produced the best lit, most natural looking result as the image uses entirely natural light (just using a reflective surface to direct it back into the shot). The reflector was positioned facing opposite the west-north-west facing window which meant that instead of the subject being slightly silhouetted by this window, he ended up being lit by the reflected light.

I then tested using two aputure LED lights, one on a medium setting of 60 and the other on a high setting of 80, however, this made the subject appear unnaturally lit which would defeat the desired natural and realistic look of the production. These LED lights were positioned in front of the south-east facing double doors with the aim of supplementing this light, but it just made the image look unnatural and artificial.

The results of the interior test shoot:

I then tested the lighting equipment in a night shoot to work out how to light the night scenes within the production. I tested using a reflector, one aputure LED light and two aputure LED lights. I used the Panasonic DVX200 on the settings: ISO 1000, aperture F/5.3, shutter speed 1/50 and no ND filter. The reflector provided no additional light to the scene, allowing these settings to be observed in the first image and ruling out the option of using the reflector in night scenes.
I then tested using just one aputure LED light on a medium brightness setting of 60 and a colour temperature of 5000K. The aim of this was to mimic street lighting, however, using just one light was not enough to expose the subject well enough. The warm colour temperature worked well though, meaning I continued to use this colour temperature when setting up the second aputure LED light.

When lighting the subject with two aputure LED lights, I kept the original light on the same settings and added another light at a setting of 80 and a colour temperature of 5000K. This provided an image with a well illuminated subject which still retained the natural look which could look as if the subject was merely lit by street lighting.

Below are the results of this lighting test. The chosen equipment for night shoots will be two aputure LED lights as this shows the best result:

I also tested lighting within the pub location as this proved to be a dim lit location, meaning artificial lighting would be necessary to illuminate the subjects. I tested three different options: no additional artificial light (just using the practical lighting within the pub - it should also be noted that there were additional christmas lights which would not be there during the actual production), using 2 aputure lights on a medium (60) and high (80) setting both set to a colour temperature of 5000K and using 2 aputure lights on a high (80) setting both set to 5000K.
The settings I used for this shoot were: ISO 800, aperture F/5.3, shutter speed 1/60 and no ND filter.
As shown below, using just the pub's practical lighting produced a dull image in which the subject is barely visible. Although this is the most natural way of lighting the set, this produced the most unnatural result - proving that artificial lighting is sometimes better and necessary.
Using both aputure lights, one on a medium setting of 60 and the other on a high setting of 80 both set to 5000K produced the best result. Whilst the subject isn't as well illuminated as the third test, this produced the most natural looking result as if the subject was just being lit by lighting within the pub - therefore, this lighting will be used for the pub scene.
Using both aputure lights on the high setting at the same colour temperature produced an unnaturally lit look which looks artificial and, therefore, takes away from the desired realistic look of the production.
Something to note about this location is the reflective surfaces such as the TV screen in the background, I must ensure that none of the crew, camera equipment or lighting equipment can be seen in this during the shoot.

The final lighting test I performed was an exterior shoot with a reflector and an aputure LED light. From the other test shoots, I had thought of just using natural light for exterior daylight scenes as this proved to produce a well exposed shot on the camera, however, I still wanted to test using lighting equipment to see if this would produce a more enhanced (yet natural) look.
I started by testing the reflector and reflecting the natural light from the north and west back onto the subject. This produced the best result as it illuminated the subject slightly better than just the natural daylight and helped to retain the natural look which is key to the production of VET-MAN.
I then tested using one aputure LED light on a medium setting of 60 and a natural colour temperature of 4200K. This made the subject look too artificially lit and unnatural which goes against the desired realistic look.


From this test shoot, I have decided on the lighting I will use in each of the scenes of the production - I will write this information in the shot list so I know how each scene is lit when it comes to the production.
The daylight scenes (both interior and exterior) will be lit naturally and supplemented with an interfit reflector.
The pub scene will be lit with the aputure LED lights.
The night scenes will be lit with the aputure LED lights.
Friday, 23 November 2018
PRE-PRODUCTION UNIT: The Storyboard
The storyboard is based on the third draft of the script as this was developed enough to give a clear idea of the story and the scenes will remain in the same order with similar action taking place (with certain bits getting cut and added).
To create the storyboard, following my research, I read through the script and picked out which action was required to depict each scene. I took into consideration that during dialogue scenes, it is not only the person talking we need to see - we also need to see the reaction of other people involved within the dialogue.
When drawing each scene I had to consider how many people were in each scene to ensure each character is depicted - in some scenes the action of a certain character takes priority, however, it is important to remember that the other characters are still there and need to react to what the character is doing. I also needed to consider how the situation at the beginning of the scene was different to the situation at the end and how this would be depicted within the shots - I needed to consider whether everything needed to be overtly depicted or whether certain things can be done through dialogue (e.g. when Tim smashes the vase in the first scene, I was unsure whether to have a shot of the smashed vase or just the reactions of Tim and Tess, however, I thought it would be more shocking to have a closeup shot of the smashed vase).
It is also important to consider who the audience are most interested in within the scene and within the production as a whole. As VET-MAN focuses mainly on Tim, he needs to be either the centre of attention for each scene or the impact of his actions need to be the focus. I also needed to consider the subtext of the scenes and consider that not only the dialogue needs to be covered but also the non-verbal cues - this was mainly the reactions of characters which I have emphasised through crash zooms.
As the production contains a lot of panning, tracking and zooming, I found this quite difficult to storyboard, therefore, I added these actions as annotations and just drew the final position of the shot.
The storyboard will be developed based on the final draft of the script once this is complete - however, this storyboard based on the third draft gives a clear idea of the plot and action and how this will be captured through the cinematography of VET-MAN.
Tuesday, 20 November 2018
PRE-PRODUCTION UNIT: Location Mapping
Before conducting my third test shoot, I decided to map out the locations to decipher where the natural light would be entering the setting. This is to help me determine whether it will be necessary to artificially light the environments we will be using (but still achieve a natural look) or whether the natural light itself will be enough to sufficiently light the actors and location (whilst still retaining a good quality, natural look).
The maps of the locations help to show where the sun rises and sets in relation to the location and, therefore, which area of the location will receive the most natural light. Naturally well-lit spaces are south facing due to the way the sun rises in the east and sets in the west, this allows for a lot of natural light and reduces the need for artificial lighting. North facing spaces are naturally less well-lit (or receive light for a smaller period of the day), making it more probable that artificial lighting will be needed to supplement the natural light. North facing interior locations are more likely to be easier to control the lighting as, with less natural light, the natural lighting changes less - meaning the lighting within the environment could be made up of entirely artificial lights and therefore be easier to manage.
It is also important for me to understand the amount of daylight available in the day so that I can work with the producer and director to schedule which scenes need to be filmed when as the lighting conditions will affect the look of the production.
The proposed filming dates are 6th February 2019, 7th February 2019 and 18th February 2019- 22nd February 2019. The daylight times for these dates are:
6th February 2019 - Sunrise: 07:27 - Sunset: 16:56 - Daylight Time: 09:29 hours
7th February 2019 - Sunrise: 07:26 - Sunset: 16:58 - Daylight Time: 09:32 hours
18th February 2019 - Sunrise: 07:06 - Sunset: 17:18 - Daylight Time: 10:12 hours
19th February 2019 - Sunrise: 07:04 - Sunset: 17:20 - Daylight Time: 10:16 hours
20th February 2019 - Sunrise: 07:02 - Sunset: 17:21 - Daylight Time: 10:19 hours
21st February 2019 - Sunrise: 07:00 - Sunset: 17:23 - Daylight Time: 10:23 hours
22nd February 2019 - Sunrise: 06:58 - Sunset: 17:25 - Daylight Time: 10:27 hours
These times were found on timeanddate.com - looking specifically at the Maidstone area.
https://www.timeanddate.com/sun/uk/maidstone?month=2&year=2019
Tess' House
Tess' house is west-north-west facing meaning that the front of the house receives the least natural light. The majority of the action in this location takes place in the living room which is naturally lit well from the south-east facing double doors at the back of the room. As the action takes place towards the west of the room, it may be necessary to add some artificial light as there is another light source at this end of the room (which may cause the character to become silhouetted as it will be behind where the characters are positioned).
I will need to test this with different light sources and reflectors as it may prove difficult for me to introduce artificial means of lighting to the production due to the handheld nature of the camera and the constant movements and zooms (the lighting will need to be easily transportable around the set).
Due to the position of the location, the best time to film will be from morning to mid afternoon. This means the majority of the light will be coming in from the double doors facing south-east, lighting the characters well. Filming here should finish before the light comes directly through the west facing window as this will create harsh silhouettes.


Sheila's House
Sheila's house is also north-west facing meaning the front of the house (the area which will be used for filming) will receive the least natural light. As we will mainly be using the exterior of the house, the lighting should be sufficient to film the scene and it is likely that artificial lights will not aid the look of the shot whilst also preventing the fast paced camera movements and zooms.
Therefore, again I will experiment using reflectors in an exterior location to bounce the light onto the subject. I will position the test subject facing different directions to see how bouncing the light back works with the light source coming from different directions.
The best time to film this scene would be morning to mid afternoon (before the sun begins to set) as this will prevent too harsh light shining onto the doorway during this.
The road outside Sheila's house is also used for the scene. Again, artificial lights would potentially interfere with the camera movements and shots, however, a runner with a reflector would be able to bounce light back into the scene effectively without interfering with the shot.

Owl Sanctuary
At the owl sanctuary we will be filming along the pathway and in the woods behind the buildings and owl enclosures. The pathway is quite naturally well-lit due to light being able to access the location from all directions, however, as the majority of the light will come from the north-west direction, there will be less time in which the pathway is in direct sunlight - this may actually be beneficial for the shoot as too direct sunlight could overexpose the image and create harsh shadows.
This scene has been adapted to occur in the evening, therefore, this will need to be artificially lit - I will be testing the aperture kit for night shoots in the test shoot.
As this location will also be used in daylight, as previously stated, I will test using a reflector in an exterior location to reflect light back at the subjects to see if this provides a better lit image whilst still retaining the natural look.
I will also test the difference between using a reflector and an LED light in a shaded area as we are using a wooded area behind the owl enclosures and buildings to shoot in. In previous test shoots, this location has proved to be well-lit enough to produce a good quality, true to life image - however, I will test whether using a reflector would enhance this further.
Due to the wooded area being completely covered in shade, I do not need to map out where the shade will fall as this will be the entire area.

The Pub
As this scene takes place in the evening, I will need to artificially light this location (both the interior of the pub and the carpark). The sun will either be setting or will have set when it comes to film this scene - therefore, if there is any natural light it will be coming from the west. This light will be a little obscured before it reaches the car park by houses and trees - this means there will be little natural light. In the car park there will be practical light in the form of street lighting and my aim is to supplement this the LED lights and a reflector. I will test this in an exterior location at night with street lights to see how the best quality (yet still natural) image will be attained.
The interior of the pub is quite poorly-lit as it is a small, old style pub. As this scene will take place during the evening, there will be little natural light coming through the windows - therefore, without artificial lighting, I would just be relying on the practical lights within the pub. I will be testing using LED lights in the pub.

Mapping out the locations has enabled me to figure out how the sun affects the settings and how I will need to compensate for this by considering; when the scene will be filmed to work best with the sun position, whether artificial lighting is needed to supplement / replace natural light, whether a reflector would be best for natural light in that scene and whether its possible to solely rely on natural light for certain locations.
This will all be tested in the next test shoot.
The maps of the locations help to show where the sun rises and sets in relation to the location and, therefore, which area of the location will receive the most natural light. Naturally well-lit spaces are south facing due to the way the sun rises in the east and sets in the west, this allows for a lot of natural light and reduces the need for artificial lighting. North facing spaces are naturally less well-lit (or receive light for a smaller period of the day), making it more probable that artificial lighting will be needed to supplement the natural light. North facing interior locations are more likely to be easier to control the lighting as, with less natural light, the natural lighting changes less - meaning the lighting within the environment could be made up of entirely artificial lights and therefore be easier to manage.
It is also important for me to understand the amount of daylight available in the day so that I can work with the producer and director to schedule which scenes need to be filmed when as the lighting conditions will affect the look of the production.
The proposed filming dates are 6th February 2019, 7th February 2019 and 18th February 2019- 22nd February 2019. The daylight times for these dates are:
6th February 2019 - Sunrise: 07:27 - Sunset: 16:56 - Daylight Time: 09:29 hours
7th February 2019 - Sunrise: 07:26 - Sunset: 16:58 - Daylight Time: 09:32 hours
18th February 2019 - Sunrise: 07:06 - Sunset: 17:18 - Daylight Time: 10:12 hours
19th February 2019 - Sunrise: 07:04 - Sunset: 17:20 - Daylight Time: 10:16 hours
20th February 2019 - Sunrise: 07:02 - Sunset: 17:21 - Daylight Time: 10:19 hours
21st February 2019 - Sunrise: 07:00 - Sunset: 17:23 - Daylight Time: 10:23 hours
22nd February 2019 - Sunrise: 06:58 - Sunset: 17:25 - Daylight Time: 10:27 hours
These times were found on timeanddate.com - looking specifically at the Maidstone area.
https://www.timeanddate.com/sun/uk/maidstone?month=2&year=2019
Tess' House
Tess' house is west-north-west facing meaning that the front of the house receives the least natural light. The majority of the action in this location takes place in the living room which is naturally lit well from the south-east facing double doors at the back of the room. As the action takes place towards the west of the room, it may be necessary to add some artificial light as there is another light source at this end of the room (which may cause the character to become silhouetted as it will be behind where the characters are positioned).
I will need to test this with different light sources and reflectors as it may prove difficult for me to introduce artificial means of lighting to the production due to the handheld nature of the camera and the constant movements and zooms (the lighting will need to be easily transportable around the set).
Due to the position of the location, the best time to film will be from morning to mid afternoon. This means the majority of the light will be coming in from the double doors facing south-east, lighting the characters well. Filming here should finish before the light comes directly through the west facing window as this will create harsh silhouettes.

Van Pick-up
The alley / road / driveway where Tim meets Luke to pick up the van is south facing. Tim will approach the driveway from the west, and therefore, this scene will likely be shot facing towards the north / west direction. So, like Tess' house, I did consider using some artificial light to supplement the natural light to ensure the characters are well-lit - but due to this being an exterior location, the natural light should be sufficient (as natural exterior lighting has proved to work well to give the desired look with the Panasonic DVX200 through the test shoots).
In the upcoming test shoot, I will test using a reflector in an outdoor environment to see if this improves the visual quality of the image whilst still retaining a natural look.
The filming here can take place during any point of the daylight times as the lighting is not obscured, meaning no harsh shadows should be cast on the van or the characters. The best time to film would be around midday to reduce the risk of any shadows interfering (but as just stated, shadows shouldn't be a major issue due to the exposed nature of the environment).

Sheila's House
Sheila's house is also north-west facing meaning the front of the house (the area which will be used for filming) will receive the least natural light. As we will mainly be using the exterior of the house, the lighting should be sufficient to film the scene and it is likely that artificial lights will not aid the look of the shot whilst also preventing the fast paced camera movements and zooms.
Therefore, again I will experiment using reflectors in an exterior location to bounce the light onto the subject. I will position the test subject facing different directions to see how bouncing the light back works with the light source coming from different directions.
The best time to film this scene would be morning to mid afternoon (before the sun begins to set) as this will prevent too harsh light shining onto the doorway during this.
The road outside Sheila's house is also used for the scene. Again, artificial lights would potentially interfere with the camera movements and shots, however, a runner with a reflector would be able to bounce light back into the scene effectively without interfering with the shot.

Owl Sanctuary
At the owl sanctuary we will be filming along the pathway and in the woods behind the buildings and owl enclosures. The pathway is quite naturally well-lit due to light being able to access the location from all directions, however, as the majority of the light will come from the north-west direction, there will be less time in which the pathway is in direct sunlight - this may actually be beneficial for the shoot as too direct sunlight could overexpose the image and create harsh shadows.
This scene has been adapted to occur in the evening, therefore, this will need to be artificially lit - I will be testing the aperture kit for night shoots in the test shoot.
As this location will also be used in daylight, as previously stated, I will test using a reflector in an exterior location to reflect light back at the subjects to see if this provides a better lit image whilst still retaining the natural look.
I will also test the difference between using a reflector and an LED light in a shaded area as we are using a wooded area behind the owl enclosures and buildings to shoot in. In previous test shoots, this location has proved to be well-lit enough to produce a good quality, true to life image - however, I will test whether using a reflector would enhance this further.
Due to the wooded area being completely covered in shade, I do not need to map out where the shade will fall as this will be the entire area.

The Pub
As this scene takes place in the evening, I will need to artificially light this location (both the interior of the pub and the carpark). The sun will either be setting or will have set when it comes to film this scene - therefore, if there is any natural light it will be coming from the west. This light will be a little obscured before it reaches the car park by houses and trees - this means there will be little natural light. In the car park there will be practical light in the form of street lighting and my aim is to supplement this the LED lights and a reflector. I will test this in an exterior location at night with street lights to see how the best quality (yet still natural) image will be attained.
The interior of the pub is quite poorly-lit as it is a small, old style pub. As this scene will take place during the evening, there will be little natural light coming through the windows - therefore, without artificial lighting, I would just be relying on the practical lights within the pub. I will be testing using LED lights in the pub.

Mapping out the locations has enabled me to figure out how the sun affects the settings and how I will need to compensate for this by considering; when the scene will be filmed to work best with the sun position, whether artificial lighting is needed to supplement / replace natural light, whether a reflector would be best for natural light in that scene and whether its possible to solely rely on natural light for certain locations.
This will all be tested in the next test shoot.
Tuesday, 13 November 2018
PRE-PRODUCTION UNIT: Presentation Two
To update Simon and the group with the progress made on VET-MAN, we produced a powerpoint presentation to display everything that had been achieved so far.
The feedback we received on this was very positive. The only thing that seemed to be lacking from my progress was lighting tests as I had decided to go for an entirely natural feel - however, Simon highlighted how a natural look doesn't always mean natural lighting - artificial lighting can be used to create an enhanced natural look which will improve the visual quality of the product. From this I decided to plan some lighting tests to see whether artificial lighting would, in fact, be better than natural lighting.
The feedback we received on this was very positive. The only thing that seemed to be lacking from my progress was lighting tests as I had decided to go for an entirely natural feel - however, Simon highlighted how a natural look doesn't always mean natural lighting - artificial lighting can be used to create an enhanced natural look which will improve the visual quality of the product. From this I decided to plan some lighting tests to see whether artificial lighting would, in fact, be better than natural lighting.
Thursday, 8 November 2018
PRE-PRODUCTION UNIT: Test Shoot 2
Today we performed the second test shoot for VET-MAN. Having tested all the potential camera choices in the first test shoot in October, I knew which camera I would be using for this test shoot (and for the final film) - the Panasonic DVX200. Therefore, in this test shoot I solely focused on testing the different settings again (using the extra knowledge from my research into the camera) and seeing how the camera would work in a complex scene from the script. This allowed me to see how the camera performs when filming this scene and also allowed me to work with the director on blocking the scene to decide which camera angles would be best to capture it - this also gave me the opportunity to see how well I worked with the director and if there was any feedback I could give to make the collaboration run smoother during actual filming.
As the original plan with this scene was to mask the footage in the edit so that the real and fake owl could be interchanged when it came to the 'owl punch', I set the camera up on the tripod as this would make it easier to map the footage. But as the idea with this project is to go entirely handheld, I planned to add a manual handheld shake to the footage in post production - this would give the illusion that the footage was shot handheld and would keep up the continuity of the piece. I also shot some footage handheld to allow enough coverage to experiment with in the edit. As it turned out, we will not map the footage in the edit, we plan to use clever cuts as this proved effective in the edit after this test shoot, meaning that I will be able to shoot this scene entirely handheld after all - I will discuss this later.
To start out the test shoot, I white balanced and black balanced the camera to ensure that the camera was well adjusted to the shaded filming environment - this meant that the white and black seen by the camera would be the same as the human eye. As found through my research, unless the camera is set to auto white balance (which is far from ideal), it cannot automatically decide how white and black look in the different light. Therefore, it was important for me to set this first to ensure the colours were accurate for the environment and the natural light in this setting.

Even though the purpose of the first test shoot was to experiment with the settings on the camera to discover how to get the best exposure, I still wanted to test a few different settings to ensure I got the best image possible. Also, as I was testing multiple cameras on the first test shoot, I was conscious that I may not have spent enough time discovering the settings of the Panasonic. I have also conducted more research into the Panasonic so I wanted to put this knowledge to the test as well.
As I couldn't find the settings for ISO last time, this was something I looked into during my research. Through my research, I found that to change the ISO manually, you must go through the settings and change the ISO for the different 'gain' settings. As I was shooting on low gain, I made the ISO for this 500 as this proved good in the last test shoot - the exposure was good with little noise in the footage.
Also during my research, I found that using an aperture deeper than F8.0 (e.g the aperture I used F10.0) will make the image appear softer through diffraction - I wanted to test this in the test shoot to see whether I could notice this difference so that I know what look to avoid during the actual shoot.
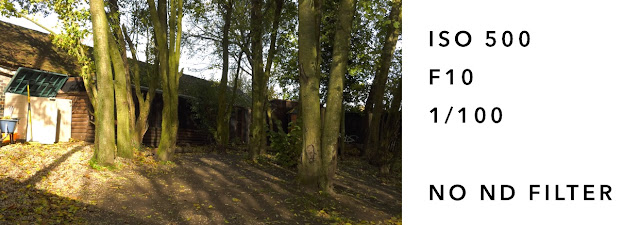
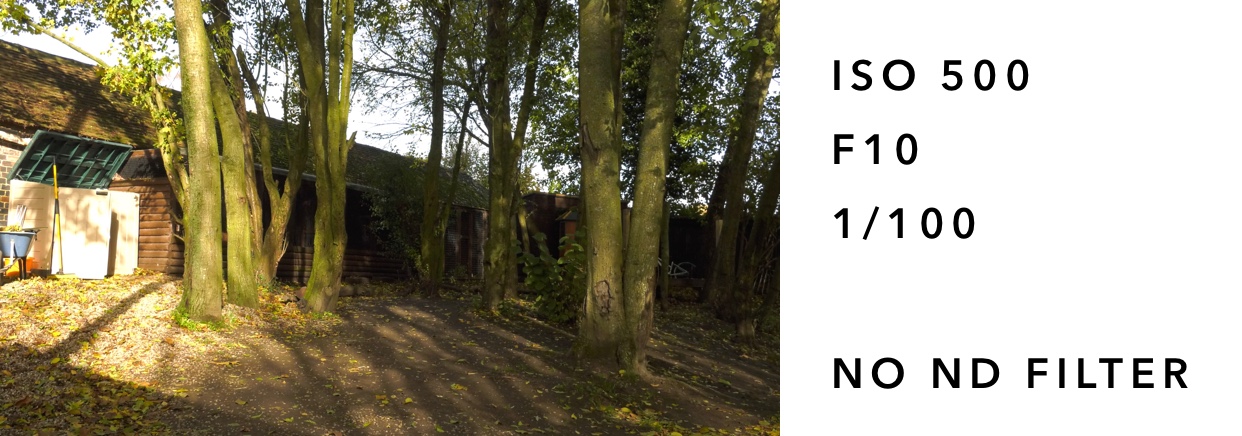
The image did appear slightly softer but not to a noticeable extent. However, I will avoid setting the aperture deeper than F8.0 to reduce the risk of a soft image as I am able to get a good exposure by changing the other settings on the camera which do not affect the softness of the image. I set the shutter speed to 1/100 which is faster than the shutter speeds used during the last test shoot. As it was a brighter day, using a faster shutter speed didn't actually make the footage too dark (which is what I was expecting following the last test shoot where I stuck between 1/50 and 1/60). In fact, without an ND filter, the footage was too bright - the sky and the beige door appeared over exposed.


As well as testing the settings on wide angle shots, I decided to test the settings with the lens zoomed in on a close up shot to see what settings gave the best exposure and the best depth of field for the most natural cinematic look.
The first set of settings I tried were ISO 500, aperture 6.4, shutter speed 1/100 and no ND filter. This gave a well exposed image, however, it was a little bright in areas (e.g. at the top of the tree and the metal of the cage behind the tree). As the aperture was quite wide, there was a fair depth of field, however, for a close up shot I would ideally have liked the depth of field to be greater to make the subject stand out more within the frame. As with a lot of the footage of the wide angle shot, I used a faster shutter speed than I used in the last test shoots as I found this gave a good result with the exposure. From this, I have decided that I would like to shoot with a shutter speed between 1/50 and 1/100 - I will test this in the next test shoot.


Testing the 'Owl Punch'
As previously mentioned, one of the reasons behind this test shoot was to test this complex scene in the script. Having read through the script, I didn't know how I would effectively capture the scene where Tim ends up punching the owl without the actor actually punching the owl. After discussion with the producer and director, we decided to buy a fake owl which would be interchanged with the real owl during the edit - a role myself and Melissa are sharing. The original plan was to film the sequence on a tripod from 3 different angles (1 long shot showing the owl flying from the owl handler to Tim, 1 medium close up over the shoulder shot of the owl flying towards Tim, and 1 close up shot of Tim punching the owl). The reason behind using the tripod was so that the camera would stay in the exact same position so that 1 shot could be taken flying the real owl and then the exact same shot could be taken with the fake owl being thrown in - the same method was used from all 3 different camera angles (although in the close up shot using the real owl, the subject did not go to punch the owl). The plan was then to map and mask the footage in the edit so that the real owl could be swapped with the fake owl to make it appear that the owl was being punched. I also filmed a handheld shot from each different angle for coverage incase I wanted to put these into the edit. However, it proved unnecessary to map and mask the footage to replace the real owl with the fake owl as with a series of quick cuts, it is unnoticeable that the owl in the final close up shot is a fake owl. The fake owl is only seen for 10 frames so to an unsuspecting audience member, the owl looks realistic. This means I ended up using 2 pieces of handheld footage (1 long handheld shot and 1 handheld close up shot) at the beginning and end of the sequence. The medium close up over the shoulder shot on the tripod captured the movement of the owl best so I decided to use this in the edit but add a handheld effect onto the footage (which was the plan if all the tripod shots had been used if I had chosen to mask the footage instead).
Colour Grading
As well as editing together the sequence, I decided to perform some colour grading to experiment with the look I wanted to achieve. Throughout this project I have been planning on achieving a natural cinematic look - this will be achieved by using colours that are natural to the environment and not too different to the raw footage the camera picks up itself - however, I will then enhance these colours to make the pictures appear more vivid. Through my research into colour I also found that the colours orange and teal are often used in major films to give a more 'epic' look. Whilst I am not attempting to achieve an 'epic' look with VET-MAN, I thought I would take elements of this and apply it to VET-MAN so that it has a cinematic look but in a more subtle way so that the project retains its natural, observational feel.

Above is the original footage and below is the colour graded footage. The main difference is how vivid the colours appear. Where the leaves appear a dirty green colour in the ungraded footage, they have been given a much warmer orange colour in the graded footage. The skin tone of the subject is also noticeably different - whilst the skin in the ungraded footage does have a natural peach / pink tone to it, it is still slightly grey in tone, making the subject a little washed out. Therefore, in the graded footage, I decided to enhance this so that the pink appears more vivid and matured yet still in a natural way.
To achieve this look, I applied an orange / teal LUT at 40% intensity and then altered the shadows to have a light blue tint (+0.2), the highlights to have a light orange tint (+0.4) and the midtones to have a blue tint (+0.1) - combined this creates the natural cinematic look I was aiming for.

Overall I thought this test shoot was successful.
I explored the settings of the Panasonic DVX200 further and was able to alter them to produce the ideal image. I figured out how to change the ISO (which is something I was unable to do during the last test shoot), however, I decided that the original ISO (500) that I had used for the first test shoot actually worked to produced the best exposed image with the least noise. The exposure worked well as when it came to editing and colour grading the footage, my main focus was altering the colours instead of having to compensate for bad exposure. I also experimented with more shutter speeds than the first test shoot and have narrowed down the shutter speed I wish to use to be between 1/50 and 1/100 - I will decide this in the next test shoot. I may decide to use slightly varying shutter speeds depending on the motion within the shot - but again, this will be decided after the next test shoot. Like the shutter speed, I will decide the exact aperture in the next test shoot but following this test shoot I know that I will want to keep it between F5.3 and F7.2 - following my research into DOPs, I know that it is important to choose a consistent aperture as this affects the depth of field of the shots and a constantly varying depth of field may be off-putting for the audience.
The owl punch was extremely successful - even though it was not achieved in the planned method, the alternative method used worked just as effectively to make this scene look realistic. Having tested this, I now have a clearer idea of how to storyboard and shoot this scene in the final project. Initially I would have thought that Tim punching an owl would be 1 or 2 shots but this 5 second screen took 3 different shots to achieve as shown by the example storyboard below.

I also thought the colour grading was successful, I managed to achieve the natural cinematic look I was aiming for. The colours and exposure remained similar to those captured by the camera, however, they appeared more enhanced and vivid.
As the original plan with this scene was to mask the footage in the edit so that the real and fake owl could be interchanged when it came to the 'owl punch', I set the camera up on the tripod as this would make it easier to map the footage. But as the idea with this project is to go entirely handheld, I planned to add a manual handheld shake to the footage in post production - this would give the illusion that the footage was shot handheld and would keep up the continuity of the piece. I also shot some footage handheld to allow enough coverage to experiment with in the edit. As it turned out, we will not map the footage in the edit, we plan to use clever cuts as this proved effective in the edit after this test shoot, meaning that I will be able to shoot this scene entirely handheld after all - I will discuss this later.
To start out the test shoot, I white balanced and black balanced the camera to ensure that the camera was well adjusted to the shaded filming environment - this meant that the white and black seen by the camera would be the same as the human eye. As found through my research, unless the camera is set to auto white balance (which is far from ideal), it cannot automatically decide how white and black look in the different light. Therefore, it was important for me to set this first to ensure the colours were accurate for the environment and the natural light in this setting.

Even though the purpose of the first test shoot was to experiment with the settings on the camera to discover how to get the best exposure, I still wanted to test a few different settings to ensure I got the best image possible. Also, as I was testing multiple cameras on the first test shoot, I was conscious that I may not have spent enough time discovering the settings of the Panasonic. I have also conducted more research into the Panasonic so I wanted to put this knowledge to the test as well.
As I couldn't find the settings for ISO last time, this was something I looked into during my research. Through my research, I found that to change the ISO manually, you must go through the settings and change the ISO for the different 'gain' settings. As I was shooting on low gain, I made the ISO for this 500 as this proved good in the last test shoot - the exposure was good with little noise in the footage.
Also during my research, I found that using an aperture deeper than F8.0 (e.g the aperture I used F10.0) will make the image appear softer through diffraction - I wanted to test this in the test shoot to see whether I could notice this difference so that I know what look to avoid during the actual shoot.
The image did appear slightly softer but not to a noticeable extent. However, I will avoid setting the aperture deeper than F8.0 to reduce the risk of a soft image as I am able to get a good exposure by changing the other settings on the camera which do not affect the softness of the image. I set the shutter speed to 1/100 which is faster than the shutter speeds used during the last test shoot. As it was a brighter day, using a faster shutter speed didn't actually make the footage too dark (which is what I was expecting following the last test shoot where I stuck between 1/50 and 1/60). In fact, without an ND filter, the footage was too bright - the sky and the beige door appeared over exposed.
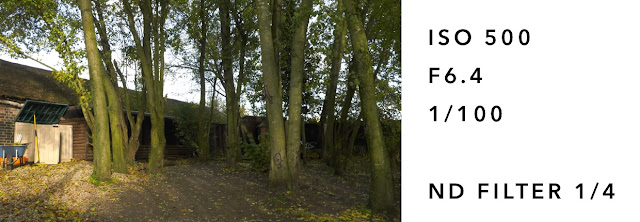
Due to the first image being overexposed, I decided to see how similar settings would look with an ND filter applied as well. I decided to widen the aperture to F6.4 to ensure the image didn't look too soft - this would also allow more light into the lens as, without widening the aperture but applying an ND filter, the image may look too artificially dull. I decided to keep the shutter speed set at 1/100 as this appeared to be good for capturing motion and applied the ND filter 1/4. This gave the ideal look - the sky remained bright but with a tint of blue, the door remained its natural beige colour, and the rest of the image is not underexposed.

After seeing how an ND filter affected the exposure of the image, I decided to see whether this look could be replicated just by adjusting the camera settings. The wider aperture of F7.2 and faster shutter speed of 1/100 and no ND filter resulted in a darker image where the beige door appeared how it did in real life, however, the sky between the trees still appeared overexposed - it appeared white instead of the blue seen in reality. This shows that using an ND filter can be necessary when aiming for as realistic image as possible - it can be difficult to ensure the sky is not overexposed without affecting the quality of the image (because to reduce the exposure I would need to go for a deeper aperture or faster shutter speed but adjusting either too much may decrease the quality or how realistic the image looks - a deeper aperture may cause a softer image by diffraction and using a shutter speed that is too fast may eliminate any motion blur which would give the footage an unrealistic smooth quality).

Although the second set of settings produced the ideal result, I still wanted to see if using a darker ND filter would improve the look of the image. As well as applying the ND filter 1/16, I set the aperture at F6.8 and chose a slower shutter speed of 1/48. Decreasing the shutter speed allows more time for light to enter the lens, meaning a brighter exposure. I thought it was necessary to decrease the shutter speed as the ND filter is quite heavy and produces a very dimly exposed image so allowing more light into the lens will allow a brighter exposure. For the same reason I also widened the aperture to increase the amount of light coming into the lens. This gave a realistic look with the sky appearing bluer than the other images but some of the shadowed areas appeared too dark and underexposed.

Overall, the settings for the second piece of footage gave the ideal result - using ISO 500, aperture f6.4, shutter speed 1/100 and an ND filter 1/4. This gave a really realistic result where the sky doesn't appear overexposed and the shadows are not underexposed. These settings also allow for the natural shadows from the sun to show up - with the first settings, these shadows appeared too harsh, whereas in the other pieces of footage, the shadows appeared too soft - giving a less natural look.

As well as testing the settings on wide angle shots, I decided to test the settings with the lens zoomed in on a close up shot to see what settings gave the best exposure and the best depth of field for the most natural cinematic look.
The first set of settings I tried were ISO 500, aperture 6.4, shutter speed 1/100 and no ND filter. This gave a well exposed image, however, it was a little bright in areas (e.g. at the top of the tree and the metal of the cage behind the tree). As the aperture was quite wide, there was a fair depth of field, however, for a close up shot I would ideally have liked the depth of field to be greater to make the subject stand out more within the frame. As with a lot of the footage of the wide angle shot, I used a faster shutter speed than I used in the last test shoots as I found this gave a good result with the exposure. From this, I have decided that I would like to shoot with a shutter speed between 1/50 and 1/100 - I will test this in the next test shoot.

For the next set of settings, I tested ISO 500, aperture F5.3, shutter speed 1/50 and ND filter 1/4. This produced an ideally exposed image where the depth of field is deep but not indistinguishable. The wider aperture of F5.3 produced this deeper depth of field, and this combined with the slower shutter speed allowed for a bright enough exposure with the 1/4 ND filter applied. The application of the ND filter meant that none of image became overexposed whilst allowing for a greater depth of field created by the wider aperture.

I also decided to test using the ND filter 1/4 with the settings ISO 500, aperture F6.2 and the shutter speed 1/180. Using a faster shutter speed resulted in a darker image - I also deepened the aperture to F6.2 which also darkened the exposure - however, I wanted to do this to combat how dark the faster shutter speed had made the background. I thought that deepening the aperture would make the background more distinguishable but as the exposure is too dark, the background is too underexposed to show detail.

Finally I tested the settings ISO 500, aperture F5.3, shutter speed 1/48 and ND filter 1/16. I wanted to see how using the ND filter 1/16 would work on a closer up shot, however, it meant that the background was too underexposed so all detail here is lost. The better naturally lit side of the background (the left hand side of frame) shows more detail than he right side of the frame which is plunged into darkness with a great lack of detail. To combat the darkness I chose a very wide aperture and a slow shutter speed to allow more light into the lens, however, this could not combat the darkness enough and ended up producing an underexposed image. I feel like these settings would have worked better under brighter or harsher light but as this was a shaded environment, the heavier ND filter was unnecessary.
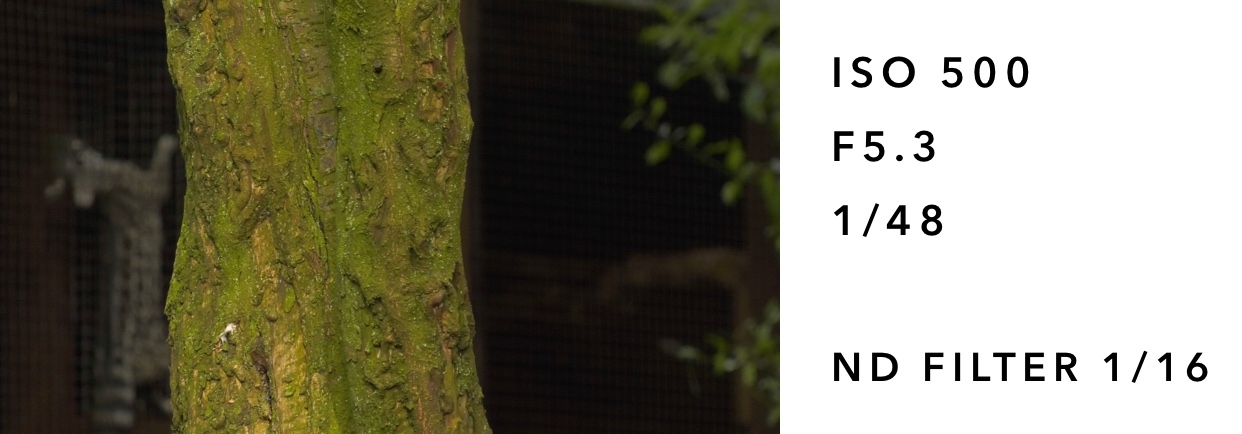
Overall, I found that the second set of settings worked best to produce a well exposed image with a good depth of field which made the subject stand out from the background whilst maintaining detail in the elements of the background. The wide exposure and slow shutter speed allow a lot of light into the lens and also allow for a good depth of field and accurate motion blur. Combined with the 1/4 ND filter, this produces a well exposed image where the highlights are not overexposed and the shadows are not underexposed - meaning the quality and detail in the image is as good as possible.

Testing the 'Owl Punch'
As previously mentioned, one of the reasons behind this test shoot was to test this complex scene in the script. Having read through the script, I didn't know how I would effectively capture the scene where Tim ends up punching the owl without the actor actually punching the owl. After discussion with the producer and director, we decided to buy a fake owl which would be interchanged with the real owl during the edit - a role myself and Melissa are sharing. The original plan was to film the sequence on a tripod from 3 different angles (1 long shot showing the owl flying from the owl handler to Tim, 1 medium close up over the shoulder shot of the owl flying towards Tim, and 1 close up shot of Tim punching the owl). The reason behind using the tripod was so that the camera would stay in the exact same position so that 1 shot could be taken flying the real owl and then the exact same shot could be taken with the fake owl being thrown in - the same method was used from all 3 different camera angles (although in the close up shot using the real owl, the subject did not go to punch the owl). The plan was then to map and mask the footage in the edit so that the real owl could be swapped with the fake owl to make it appear that the owl was being punched. I also filmed a handheld shot from each different angle for coverage incase I wanted to put these into the edit. However, it proved unnecessary to map and mask the footage to replace the real owl with the fake owl as with a series of quick cuts, it is unnoticeable that the owl in the final close up shot is a fake owl. The fake owl is only seen for 10 frames so to an unsuspecting audience member, the owl looks realistic. This means I ended up using 2 pieces of handheld footage (1 long handheld shot and 1 handheld close up shot) at the beginning and end of the sequence. The medium close up over the shoulder shot on the tripod captured the movement of the owl best so I decided to use this in the edit but add a handheld effect onto the footage (which was the plan if all the tripod shots had been used if I had chosen to mask the footage instead).
Colour Grading
As well as editing together the sequence, I decided to perform some colour grading to experiment with the look I wanted to achieve. Throughout this project I have been planning on achieving a natural cinematic look - this will be achieved by using colours that are natural to the environment and not too different to the raw footage the camera picks up itself - however, I will then enhance these colours to make the pictures appear more vivid. Through my research into colour I also found that the colours orange and teal are often used in major films to give a more 'epic' look. Whilst I am not attempting to achieve an 'epic' look with VET-MAN, I thought I would take elements of this and apply it to VET-MAN so that it has a cinematic look but in a more subtle way so that the project retains its natural, observational feel.

Above is the original footage and below is the colour graded footage. The main difference is how vivid the colours appear. Where the leaves appear a dirty green colour in the ungraded footage, they have been given a much warmer orange colour in the graded footage. The skin tone of the subject is also noticeably different - whilst the skin in the ungraded footage does have a natural peach / pink tone to it, it is still slightly grey in tone, making the subject a little washed out. Therefore, in the graded footage, I decided to enhance this so that the pink appears more vivid and matured yet still in a natural way.
To achieve this look, I applied an orange / teal LUT at 40% intensity and then altered the shadows to have a light blue tint (+0.2), the highlights to have a light orange tint (+0.4) and the midtones to have a blue tint (+0.1) - combined this creates the natural cinematic look I was aiming for.

Overall I thought this test shoot was successful.
I explored the settings of the Panasonic DVX200 further and was able to alter them to produce the ideal image. I figured out how to change the ISO (which is something I was unable to do during the last test shoot), however, I decided that the original ISO (500) that I had used for the first test shoot actually worked to produced the best exposed image with the least noise. The exposure worked well as when it came to editing and colour grading the footage, my main focus was altering the colours instead of having to compensate for bad exposure. I also experimented with more shutter speeds than the first test shoot and have narrowed down the shutter speed I wish to use to be between 1/50 and 1/100 - I will decide this in the next test shoot. I may decide to use slightly varying shutter speeds depending on the motion within the shot - but again, this will be decided after the next test shoot. Like the shutter speed, I will decide the exact aperture in the next test shoot but following this test shoot I know that I will want to keep it between F5.3 and F7.2 - following my research into DOPs, I know that it is important to choose a consistent aperture as this affects the depth of field of the shots and a constantly varying depth of field may be off-putting for the audience.
The owl punch was extremely successful - even though it was not achieved in the planned method, the alternative method used worked just as effectively to make this scene look realistic. Having tested this, I now have a clearer idea of how to storyboard and shoot this scene in the final project. Initially I would have thought that Tim punching an owl would be 1 or 2 shots but this 5 second screen took 3 different shots to achieve as shown by the example storyboard below.

I also thought the colour grading was successful, I managed to achieve the natural cinematic look I was aiming for. The colours and exposure remained similar to those captured by the camera, however, they appeared more enhanced and vivid.
Subscribe to:
Posts (Atom)