
As the original plan with this scene was to mask the footage in the edit so that the real and fake owl could be interchanged when it came to the 'owl punch', I set the camera up on the tripod as this would make it easier to map the footage. But as the idea with this project is to go entirely handheld, I planned to add a manual handheld shake to the footage in post production - this would give the illusion that the footage was shot handheld and would keep up the continuity of the piece. I also shot some footage handheld to allow enough coverage to experiment with in the edit. As it turned out, we will not map the footage in the edit, we plan to use clever cuts as this proved effective in the edit after this test shoot, meaning that I will be able to shoot this scene entirely handheld after all - I will discuss this later.
To start out the test shoot, I white balanced and black balanced the camera to ensure that the camera was well adjusted to the shaded filming environment - this meant that the white and black seen by the camera would be the same as the human eye. As found through my research, unless the camera is set to auto white balance (which is far from ideal), it cannot automatically decide how white and black look in the different light. Therefore, it was important for me to set this first to ensure the colours were accurate for the environment and the natural light in this setting.

Even though the purpose of the first test shoot was to experiment with the settings on the camera to discover how to get the best exposure, I still wanted to test a few different settings to ensure I got the best image possible. Also, as I was testing multiple cameras on the first test shoot, I was conscious that I may not have spent enough time discovering the settings of the Panasonic. I have also conducted more research into the Panasonic so I wanted to put this knowledge to the test as well.
As I couldn't find the settings for ISO last time, this was something I looked into during my research. Through my research, I found that to change the ISO manually, you must go through the settings and change the ISO for the different 'gain' settings. As I was shooting on low gain, I made the ISO for this 500 as this proved good in the last test shoot - the exposure was good with little noise in the footage.
Also during my research, I found that using an aperture deeper than F8.0 (e.g the aperture I used F10.0) will make the image appear softer through diffraction - I wanted to test this in the test shoot to see whether I could notice this difference so that I know what look to avoid during the actual shoot.
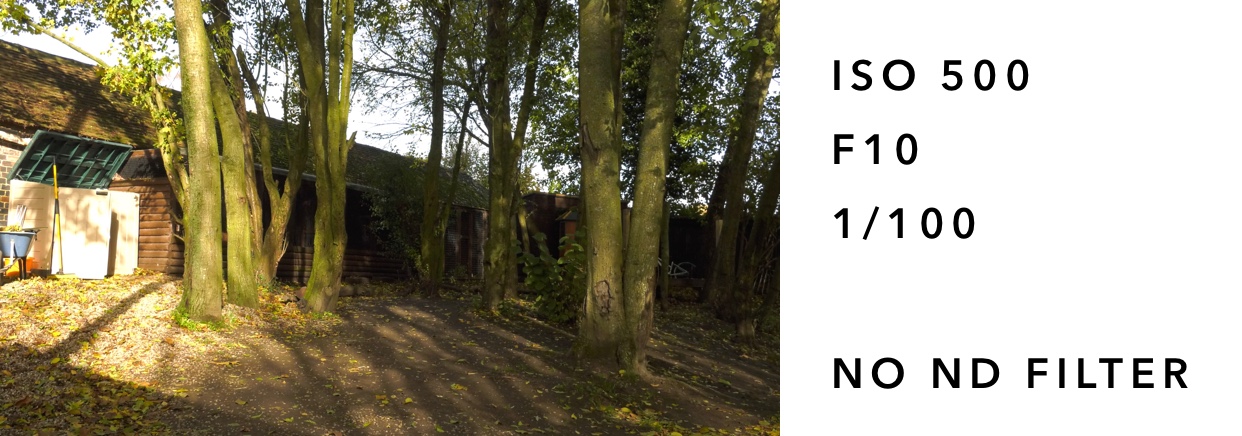
The image did appear slightly softer but not to a noticeable extent. However, I will avoid setting the aperture deeper than F8.0 to reduce the risk of a soft image as I am able to get a good exposure by changing the other settings on the camera which do not affect the softness of the image. I set the shutter speed to 1/100 which is faster than the shutter speeds used during the last test shoot. As it was a brighter day, using a faster shutter speed didn't actually make the footage too dark (which is what I was expecting following the last test shoot where I stuck between 1/50 and 1/60). In fact, without an ND filter, the footage was too bright - the sky and the beige door appeared over exposed.
Due to the first image being overexposed, I decided to see how similar settings would look with an ND filter applied as well. I decided to widen the aperture to F6.4 to ensure the image didn't look too soft - this would also allow more light into the lens as, without widening the aperture but applying an ND filter, the image may look too artificially dull. I decided to keep the shutter speed set at 1/100 as this appeared to be good for capturing motion and applied the ND filter 1/4. This gave the ideal look - the sky remained bright but with a tint of blue, the door remained its natural beige colour, and the rest of the image is not underexposed.

After seeing how an ND filter affected the exposure of the image, I decided to see whether this look could be replicated just by adjusting the camera settings. The wider aperture of F7.2 and faster shutter speed of 1/100 and no ND filter resulted in a darker image where the beige door appeared how it did in real life, however, the sky between the trees still appeared overexposed - it appeared white instead of the blue seen in reality. This shows that using an ND filter can be necessary when aiming for as realistic image as possible - it can be difficult to ensure the sky is not overexposed without affecting the quality of the image (because to reduce the exposure I would need to go for a deeper aperture or faster shutter speed but adjusting either too much may decrease the quality or how realistic the image looks - a deeper aperture may cause a softer image by diffraction and using a shutter speed that is too fast may eliminate any motion blur which would give the footage an unrealistic smooth quality).

Although the second set of settings produced the ideal result, I still wanted to see if using a darker ND filter would improve the look of the image. As well as applying the ND filter 1/16, I set the aperture at F6.8 and chose a slower shutter speed of 1/48. Decreasing the shutter speed allows more time for light to enter the lens, meaning a brighter exposure. I thought it was necessary to decrease the shutter speed as the ND filter is quite heavy and produces a very dimly exposed image so allowing more light into the lens will allow a brighter exposure. For the same reason I also widened the aperture to increase the amount of light coming into the lens. This gave a realistic look with the sky appearing bluer than the other images but some of the shadowed areas appeared too dark and underexposed.

Overall, the settings for the second piece of footage gave the ideal result - using ISO 500, aperture f6.4, shutter speed 1/100 and an ND filter 1/4. This gave a really realistic result where the sky doesn't appear overexposed and the shadows are not underexposed. These settings also allow for the natural shadows from the sun to show up - with the first settings, these shadows appeared too harsh, whereas in the other pieces of footage, the shadows appeared too soft - giving a less natural look.

As well as testing the settings on wide angle shots, I decided to test the settings with the lens zoomed in on a close up shot to see what settings gave the best exposure and the best depth of field for the most natural cinematic look.
The first set of settings I tried were ISO 500, aperture 6.4, shutter speed 1/100 and no ND filter. This gave a well exposed image, however, it was a little bright in areas (e.g. at the top of the tree and the metal of the cage behind the tree). As the aperture was quite wide, there was a fair depth of field, however, for a close up shot I would ideally have liked the depth of field to be greater to make the subject stand out more within the frame. As with a lot of the footage of the wide angle shot, I used a faster shutter speed than I used in the last test shoots as I found this gave a good result with the exposure. From this, I have decided that I would like to shoot with a shutter speed between 1/50 and 1/100 - I will test this in the next test shoot.

For the next set of settings, I tested ISO 500, aperture F5.3, shutter speed 1/50 and ND filter 1/4. This produced an ideally exposed image where the depth of field is deep but not indistinguishable. The wider aperture of F5.3 produced this deeper depth of field, and this combined with the slower shutter speed allowed for a bright enough exposure with the 1/4 ND filter applied. The application of the ND filter meant that none of image became overexposed whilst allowing for a greater depth of field created by the wider aperture.

I also decided to test using the ND filter 1/4 with the settings ISO 500, aperture F6.2 and the shutter speed 1/180. Using a faster shutter speed resulted in a darker image - I also deepened the aperture to F6.2 which also darkened the exposure - however, I wanted to do this to combat how dark the faster shutter speed had made the background. I thought that deepening the aperture would make the background more distinguishable but as the exposure is too dark, the background is too underexposed to show detail.

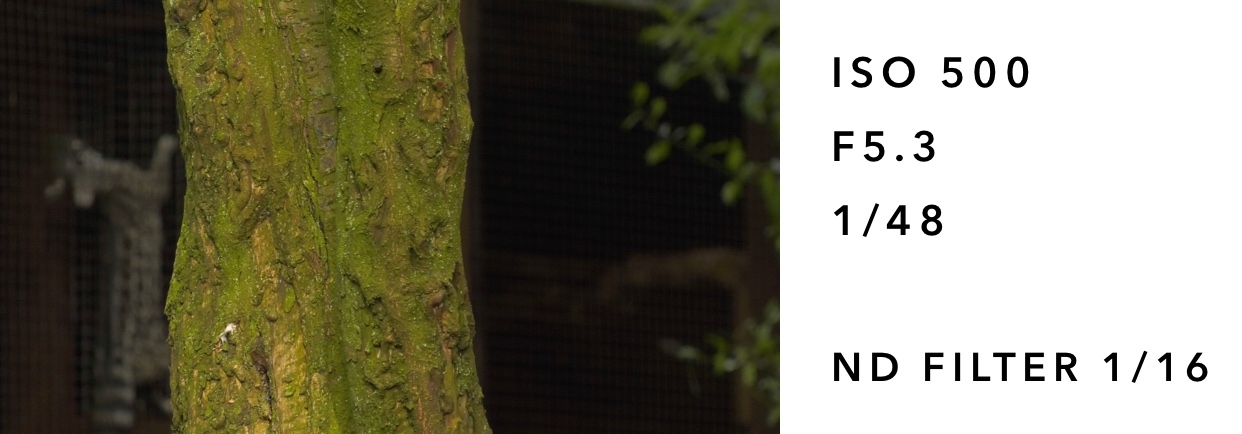
Finally I tested the settings ISO 500, aperture F5.3, shutter speed 1/48 and ND filter 1/16. I wanted to see how using the ND filter 1/16 would work on a closer up shot, however, it meant that the background was too underexposed so all detail here is lost. The better naturally lit side of the background (the left hand side of frame) shows more detail than he right side of the frame which is plunged into darkness with a great lack of detail. To combat the darkness I chose a very wide aperture and a slow shutter speed to allow more light into the lens, however, this could not combat the darkness enough and ended up producing an underexposed image. I feel like these settings would have worked better under brighter or harsher light but as this was a shaded environment, the heavier ND filter was unnecessary.
Overall, I found that the second set of settings worked best to produce a well exposed image with a good depth of field which made the subject stand out from the background whilst maintaining detail in the elements of the background. The wide exposure and slow shutter speed allow a lot of light into the lens and also allow for a good depth of field and accurate motion blur. Combined with the 1/4 ND filter, this produces a well exposed image where the highlights are not overexposed and the shadows are not underexposed - meaning the quality and detail in the image is as good as possible.

Testing the 'Owl Punch'
As previously mentioned, one of the reasons behind this test shoot was to test this complex scene in the script. Having read through the script, I didn't know how I would effectively capture the scene where Tim ends up punching the owl without the actor actually punching the owl. After discussion with the producer and director, we decided to buy a fake owl which would be interchanged with the real owl during the edit - a role myself and Melissa are sharing. The original plan was to film the sequence on a tripod from 3 different angles (1 long shot showing the owl flying from the owl handler to Tim, 1 medium close up over the shoulder shot of the owl flying towards Tim, and 1 close up shot of Tim punching the owl). The reason behind using the tripod was so that the camera would stay in the exact same position so that 1 shot could be taken flying the real owl and then the exact same shot could be taken with the fake owl being thrown in - the same method was used from all 3 different camera angles (although in the close up shot using the real owl, the subject did not go to punch the owl). The plan was then to map and mask the footage in the edit so that the real owl could be swapped with the fake owl to make it appear that the owl was being punched. I also filmed a handheld shot from each different angle for coverage incase I wanted to put these into the edit. However, it proved unnecessary to map and mask the footage to replace the real owl with the fake owl as with a series of quick cuts, it is unnoticeable that the owl in the final close up shot is a fake owl. The fake owl is only seen for 10 frames so to an unsuspecting audience member, the owl looks realistic. This means I ended up using 2 pieces of handheld footage (1 long handheld shot and 1 handheld close up shot) at the beginning and end of the sequence. The medium close up over the shoulder shot on the tripod captured the movement of the owl best so I decided to use this in the edit but add a handheld effect onto the footage (which was the plan if all the tripod shots had been used if I had chosen to mask the footage instead).
Colour Grading
As well as editing together the sequence, I decided to perform some colour grading to experiment with the look I wanted to achieve. Throughout this project I have been planning on achieving a natural cinematic look - this will be achieved by using colours that are natural to the environment and not too different to the raw footage the camera picks up itself - however, I will then enhance these colours to make the pictures appear more vivid. Through my research into colour I also found that the colours orange and teal are often used in major films to give a more 'epic' look. Whilst I am not attempting to achieve an 'epic' look with VET-MAN, I thought I would take elements of this and apply it to VET-MAN so that it has a cinematic look but in a more subtle way so that the project retains its natural, observational feel.

Above is the original footage and below is the colour graded footage. The main difference is how vivid the colours appear. Where the leaves appear a dirty green colour in the ungraded footage, they have been given a much warmer orange colour in the graded footage. The skin tone of the subject is also noticeably different - whilst the skin in the ungraded footage does have a natural peach / pink tone to it, it is still slightly grey in tone, making the subject a little washed out. Therefore, in the graded footage, I decided to enhance this so that the pink appears more vivid and matured yet still in a natural way.
To achieve this look, I applied an orange / teal LUT at 40% intensity and then altered the shadows to have a light blue tint (+0.2), the highlights to have a light orange tint (+0.4) and the midtones to have a blue tint (+0.1) - combined this creates the natural cinematic look I was aiming for.

Overall I thought this test shoot was successful.
I explored the settings of the Panasonic DVX200 further and was able to alter them to produce the ideal image. I figured out how to change the ISO (which is something I was unable to do during the last test shoot), however, I decided that the original ISO (500) that I had used for the first test shoot actually worked to produced the best exposed image with the least noise. The exposure worked well as when it came to editing and colour grading the footage, my main focus was altering the colours instead of having to compensate for bad exposure. I also experimented with more shutter speeds than the first test shoot and have narrowed down the shutter speed I wish to use to be between 1/50 and 1/100 - I will decide this in the next test shoot. I may decide to use slightly varying shutter speeds depending on the motion within the shot - but again, this will be decided after the next test shoot. Like the shutter speed, I will decide the exact aperture in the next test shoot but following this test shoot I know that I will want to keep it between F5.3 and F7.2 - following my research into DOPs, I know that it is important to choose a consistent aperture as this affects the depth of field of the shots and a constantly varying depth of field may be off-putting for the audience.
The owl punch was extremely successful - even though it was not achieved in the planned method, the alternative method used worked just as effectively to make this scene look realistic. Having tested this, I now have a clearer idea of how to storyboard and shoot this scene in the final project. Initially I would have thought that Tim punching an owl would be 1 or 2 shots but this 5 second screen took 3 different shots to achieve as shown by the example storyboard below.

I also thought the colour grading was successful, I managed to achieve the natural cinematic look I was aiming for. The colours and exposure remained similar to those captured by the camera, however, they appeared more enhanced and vivid.
No comments:
Post a Comment